 |
|
|
Shelving Unit

Shelving has always struck me as being a particularly boring thing to build. The standard shelving unit has two sides, a back and a number of actual shelves in the middle. Because of this, it was a project that I delayed for as long as I possibly could, but finally the sheer mass of clutter in my home forced my hand...or was it my wife's insistence that I clear up my "junk" somehow.
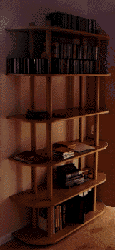
Still in search of something a little different from the norm, I finally came up with this design. Although originally designed to fit into an alcove, the lack of sides and a back meant that when I moved house, the shelving unit worked just as well on a normal wall.
In the below reproduction of this project I have cheated slightly: in the original project I turned the columns out of solid beech using a lathe. The advantage of this was that I could make the columns any diameter I wanted. Of course, the disadvantage was that I had to learn how to use a lathe and since I always believe in learning as I go along, some of the columns came out better than others! The alternative (and far easier) approach is to use to widest diameter of dowel that you can purchase (typically around one inch). The result is just as effective.
Construction
For this project I elected to use beech. Although a relatively expensive wood I felt that the final result would make it worthwhile as beech gives a very nice finish when waxed. Also, as I planned to store my stereo unit on one of the shelves, I wanted to use a wood that would not warp too easily.
To make the shelves cut the beech to a length of 46 inches long, 15 1/2 inches wide and 3/4 inches thick. To get this width you will have to dowel two pieces of beech together (see joints section). In all you will need six shelves so it is wise to plan ahead and begin the doweling process about a week before you start the main part of the project (unless you have a tremendous number of sash clamps).

Once you have cut the shelves to their rough shape, mark out the final shape (including the curves) on one piece. This final shape is obviously up to each individual, but I have supplied a rough template to give you the right idea. Note also that on this template I have marked where the four holes should be drilled. Do not, yet, worry about these holes, instead concentrating on getting the shape right.
Once you have marked out the shape of the first shelf, cut it out using a jigsaw. Cut just outside of the line you have drawn and then sand the edge down to a smooth shape.
When you are satisfied with this shelf, use it as a template for all of the other shelves. Having marked out the other five shelves, cut them to shape, and sand them down to match the shape of the first shelf.
Once all the shelves are of a satisfactory shape, mark the positions of the four holes on the top shelf. The diameter of these holes should be somewhere around 3/8 inches. The precise diameter of the holes should be matched to whatever thin dowel you have available (see next section for an explanation of why you need these).
Drill the holes through the top shelf. Then drill matching holes through the other five shelves, using this top shelf as a template again.
The columns
As discussed earlier, the columns (supports) should be constructed out of the widest diameter of dowel that you can buy (typically between 1 and 2 inches). Each support should be 13 1/4 inches long. In total, you will need to cut out 20 of these.
In addition, it is necessary to cut out 8 more columns, of length 2 inches. These are used as to tops and the feet of the shelving unit.
Once you have cut out all of these shapes you need to drill a small hole in each end of the 13 1/4 inch columns. This hole should match the size of the thin dowel that you have available (the dowel that you used as a match for the holes in the shelves). These holes should be at least 1/2 inch deep and must be in the center of the top and bottom of each column. For the feet and the tops, just make a hole in one end.
Once you have done this, sand all of the columns and slightly round off the top of the top pieces and the bottom of the feet pieces to give a more pleasing finish.
Putting it all together
Before constructing the shelves, wax them. The columns will need to be stained to match the wood used for the shelves (it is unlikely that you managed to get beech dowel) and then waxed.

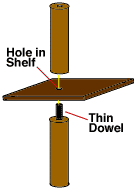
It is now time to put the shelves together. First, place a thin dowel (length 1 3/4 inches) into the holes of the four feet, and then push these dowel/feet combinations against the bottom shelf so that the thin dowel passes through the four holes made in the shelf. Then, place four columns on top of this shelf, ensuring that the dowels enter the holes in the bottom of these columns. Then place thin dowels into the tops of these columns and repeat the process with the next shelf. And so on until you have placed the tops onto the final shelf. Note that there is no need to glue these columns in place. Indeed it is a distinct advantage to not glue them as this means that you will be able to disassemble the shelving unit if necessary.
To ensure that the shelving unit is completely stable, it is worth attaching the shelving to the wall by the use of small, angled brass plates that can be screwed into the bottom of the shelf (at the back) and then into the wall. It is not necessary to do this on every shelf, just on every other shelf.