 |
|
|
Puzzle box
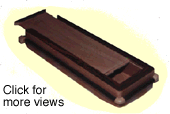
This box is based on an old Japanese style of concealing the mechanism that allows the box to open. Rather than just having a simple sliding top, this box also has a concealed locking mechanism that must be dealt with in order to open the box. To open the box, the front strip of cocobolo must be slid to one side, thus allowing the top to slide out freely. This particular box was designed for an assortment of random items, but the theory behind this style can be adopted for a plethora of projects, including jewelry boxes, money banks and so on. To make the box more interesting, three types of wood were used: cherry (for the main panels); cocobolo (for the top and middle strip); birch (for the small corner pieces).
Construction
Tools required: Router, sander, miter saw (not necessary power version), table saw (optional)
Wood required:
| Description | Qty | Width | Length | Thickness |
| Sides (Cherry) | 2 | 2" (51 mm) | 11 3/4" (298 mm) | 1/2" (13 mm) |
| Ends (Cherry) | 2 | 2" (51 mm) | 4" (102 mm) | 1/2" (13 mm) |
| Lid (Cherry) | 1 | 3 1/4" (83 mm) | 11" (279 mm) | 1/4" (6 mm) |
| Lid End (Cherry) | 1 | 1/2" (13 mm) | 4" (102 mm) | 1/2" (13 mm) |
| Base (Cherry) | 1 | 3 1/4" (83 mm) | 11" (279 mm) | 1/4" (6 mm) |
| Middle strip sides (Cocobolo) | 2 | 1/2" (13 mm) | 11 1/4" (286 mm) | 1/2" (13 mm) |
| Middle strip ends (Cocobolo) | 2 | 1/2" (13 mm) | 3 1/2" (89 mm) | 1/2" (13 mm) |
| Top strip sides (Cocobolo) | 2 | 9/16" (14 mm) | 11 3/4" (298 mm) | 1/4" (6 mm) |
| Top strip ends (Cocobolo) | 2 | 9/16" (14 mm) | 4" (102 mm) | 1/4" (6 mm) |
| Corner pieces (Birch) | 4 | 1/2" (13 mm) | 1/2" (13 mm) | 1/2" (13 mm) |
| Locking mechanism (Cherry) | 1 | 7/16" (11 mm) | 1" (25 mm) | 1/8" (3 mm) |

Cut the sides and ends to the correct dimensions. As a part of this process, miter the ends to a 45 degree angle, so that when joined together, the four pieces will form a box. Mitering is used so that no end wood will be on display in the finished product. This is important because if the end of, say, one of the sides were to show, the grooves that hold the base and top in place would be evident.
Once all four pieces have been cut to size, cut a groove on the inside of each piece to accommodate the base. [Remember, the inside of each piece is the shorter side -- with the mitered edges showing.] This groove should be 1/8" (3 mm) deep, 1/8" wide, and should be 1/8" in from the bottom of each piece. The easiest way to cut this groove is to use a circular saw or router. Once you have made this groove on all four pieces, match it by creating a new groove that is 1/8" (3 mm) from the top of each piece, except for one of the two end pieces. This second groove will accommodate the sliding lid. On one of the two end pieces, instead of creating this second groove, cut off the top of the end so that the end piece is now only 1 3/4" (44 mm) high -- the same height as the distance to the beginning of the groove from the bottom. Removing this 1/4" (6 mm) of the end block provides a way for the top to slide in and out.

Take this shortened end piece (from now on referred to as the "locking end") and rout out a space for the locking mechanism on the inside (shorter) of it. See the diagram for the exact dimensions of this routed area. The routed area should be cut to a depth of 1/4" (6 mm), leaving a remaining 1/4" (6 mm) of wood.

Next, take the base and rout a lip all the way around it. The area to be routed out should be 1/8" (3 mm) deep and should cut up to 1/8" in from the edge. The result should be a lip that slots into the groove running around the bottom of the sides and end pieces. Having routed the lip all the way around the base, repeat this for the lid as well. This lip around the lid will allow it to slide in and out of the box. At this point, glue the sides and end pieces together around the base piece, remembering to place a small amount of glue in the groove, thus gluing the base into place. Clamp overnight until dry, having first ensured that the box is square.
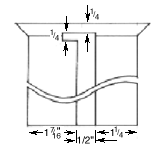
While the main box is drying, rout out a groove down the underside of the lid. The purpose of this groove is to allow the lid to slide over the locking mechanism (once the box is unlocked). To determine where this groove should be, elect one end of the lid to be the lock end. Looking at the underside of the lid, with the lock end furthest away from you, the groove should be 1/2" wide, 1 1/2" from the left side (and 1 1/4" from the right side). This groove should be 3/16" deep. Once you have cut this groove, cut out an additional niche to the left of the main groove (the same depth). The niche accommodates the locking mechanism when the box is locked. This additional niche should be 1/2" wide and should cut in 1/8" from the lock end (see diagram).
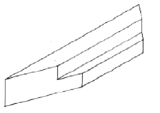
The lock end of the lid needs an additional piece of wood to be added to it so that it matches the other sides. This "lid end" should be 1/2" (13 mm) wide, 1/2" thick and 4" (102 mm) long. The ends of this length should be cut at a 45 degree angle, so that (when attached to the lid) the lid end fits into the box neatly (see diagram). Once the lid end has been cut to size, rout out a lip on the underside that is 1/8" (3 mm) deep and 1/8" wide. This allows the lid end to match up with the lock end of the lid. In addition to this lip, rout out an additional niche to accommodate the locking mechanism. This additional niche should be 1" from the left (when looking at the underside of the lid end -- and the measurement is based on the narrower length) to 1 1/4" from the right and should cut 1/4" from the inside edge.
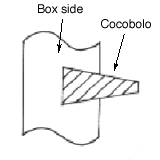
Once the main box is dry, it is time to rout out the groove for the decorative strip that runs around its middle. This groove is cut using a 14 degree, dovetail router bit. The use of a dovetail bit means that the groove has a cross profile of a wedge, and thus holds the cocobolo strip in place. This is important because the lock end cocobolo strip is not glued in place, as it must be free to slide (without falling out!). Cut the groove at a height of 7/8" to 1 1/4" from the bottom of the box, to a depth of 1/4". The end result should be a groove that is 3/8" wide at the surface (but considerable wider -- 1/2" -- further into the depth of the side). Rout this groove on all four sides of the box.
Once this groove has been routed out, it is time to neaten up each corner of the groove. Using a chisel, increase the size of each groove end to a height of 1/2" (13 mm) (basically, the same width as the groove is at its deepest. This widening should only be done for 1/2" in from each corner. This means that the square birch corner pieces should just fit into each of the widened corners.
Now cut the two side strips of cocobolo to the correct cross profile. These should be wedge-shaped (see diagram) so that they will slot into the grooves made above. At this time, also cut the two end strips to the same profile. If you have a table saw, this is certainly the easiest way to cut these strips, although you can also plane them down to the correct profile (or even rout them). Test that the strips will slide into the middle grooves. While they should be a reasonably tight fit, don't make these strips too tight a fit -- otherwise the end piece won't slide freely.
Before you glue the strips into place, sand down the main box, and round off the corners a little. Then, glue the two side strip pieces and the non-locking end strip piece into the correct grooves. At the same time, glue three of the corner pieces into place. The one corner piece that should not be glued into place is the one at the right hand end of the locking groove (when facing this end).
Slide the final (locking end) strip into place and glue the final corner piece onto this strip. Be very careful to make sure that the glue only makes contact with the corner piece and locking end strip, as this piece must be able to slide out freely. Leave to dry overnight.
Once dry, remove the locking end strip (with the attached corner piece) and apply wax to the groove. This will help the strip to slide more easily. Then, replace the strip back into the groove and ensure that it is pushed in all the way.
Glue and screw the locking mechanism to the inside edge of the sliding cocobolo by placing the locking mechanism wood in the space that you routed out for it in the locking end piece. The locking mechanism should be attached at a distance of 1 1/2" from the left hand side (when looking at this from the front, not the inside) and should stick up proud of the locking end by a height of 1/8" (3 mm). Double check that your particular version of this box agrees with this position -- it should position the locking piece in the niche cut in the lid, NOT the main groove cut in the lid. When applying the glue, take care to ensure that it only makes contact with the cocobolo and the locking mechanism (otherwise, the sliding piece may be glued fast to the box by mistake).
Once this is dry, test out the mechanism. The box should be locked when the locking end middle strip is pushed in all the way, and should be unlocked (so that you can slide the lid out) when this strip is pushed to the right (i.e. juts out from the side).
Adding the final touches

To all intents and purposes, the box is now complete. However, if you wish you can add the top strips. The advantage of adding these is that they help to camouflage the joint between the sliding lid and the main box as the strips overhang slightly. These strips have a triangular profile of 1/4" (6 mm) at the widest down to a point (see diagram). These strips should be attached to the box with the narrow, pointed side pointing out, and the thicker side nearer the middle. Cut these pieces to the correct length using a 45 degree cut to allow for a neat joint at each corner. When gluing these strips into place, it is advisable to remove the lid, thus ensuring that the strips cannot accidentally be glued to the lid, thus sealing the box shut.
Once everything is dry, sand down the box using various grades of sandpaper (down to the finest). Round of the sharp corners of the birch corner pieces. Then wax the box, taking care to wax the lip running around the lid, as this will help the lid to slide in and out more smoothly.