 |
|
|
Coat Rack
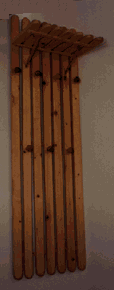
This coat rack is one of the simpler projects that we have featured in Amateur Woodworker. It was designed to fit in a small hallway and had to accommodate both coats and the usual paraphernalia such as gloves and hats (hence the shelf). The reasoning behind the lemgth of the coat rack was to allow wet coats to rest against the wooden slats, rather than the wall, as well as allowing for more coat hooks to be fitted into the relatively small space.
Construction
Tools required: drill, jigsaw, sander
Wood list (Pine)
| Description | Qty | Depth | Width | Length |
| Main vertical slats | 7 | 3/4" | 1 1/2" | 53" |
| Shelf slats | 7 | 3/4" | 1 1/2" | 10" |
| Cross members | 5 | 1/4" | 3/4" | 15" |
| Support dowels | 2 | 1/2" | 1/2" | 8" |
| Hooks | 7 |
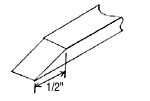
Ensure that all seven of the main vertical slats are cut to the same length and round off both ends using a jigsaw. Then sand these pieces (it will be difficult to sand them once the project is complete). Take the five cross member pieces and sand each end down into a wedge shape (see diagram on left). Again, sand all five of the support pieces now, rather than waiting until the project's completion.
Lay the seven vertical slats side by side, with a gap of 5/8" between each one. Then, nail or screw (and glue) three of the cross members to these seven slats. These cross members should be positioned 4" from the top and bottom of the slats, with the remaining one being in the center. Obviously, the flat side of the cross member (rather than the wedge-shaped side) should be attached to the vertical slats. Take the time to ensure that the cross members are attached at a 90 degree angle to the vertical slats.
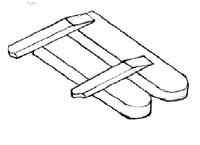
Next, round off one end of each of the seven shelf slats. As with the vertical slats, lay out the shelf slats side-by-side, with a gap of 5/8" between each slat. It is important to ensure that this layout is identical to that of the main vertical slats. For this reason, it is a good idea to lay out the shelf slats on top of the vertical slats, thus ensuring a close match. Once laid out correctly, attach the remaining two cross members. One cross member should be flush with the flat end of the shelf slats, while the other cross member should be 3" from the curved end of the slats (see diagram).
Now it is time to make the holes into which the support dowels will fit. These support dowels are fitted at a 45 degree angle and therefore, the holes into which they fit must also be at a 45 degree angle. Drill a hole in the second and sixth slat of the shelf, at a 45 degree angle, 5 1/2" away from the flat end of the shelf. Note: these holes should be in the underside of the shelf (ie. the side that has the cross members attached) and should angle the dowel towards the back of the shelf (the flat end rather than the curved end).
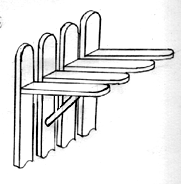
Then, drill holes in the second and sixth main vertical slats, 11" from the top of the unit. These holes should again be at an angle of 45 degrees, allowing the dowel to angle upwards. Note that these holes should be in the front of the vertical slats (ie. the side that does not show the cross members).
Having made these holes, glue the dowel to the main slats. Then glue into the shelf unit. At the same time, screw the shelf unit into the main slats from the rear. The shelf should be attached 6" from the top of the unit.
Small drawer handles were used as the actual coat hooks for this project. Every other vertical slat should have a hook fastened to it, 5 1/2" beneath the shelf. Then, the remaining slats should have a hook attached 21" below the shelf.
To attach the coat rack to the wall, drill holes into the top and bottom cross member pieces in-between the vertical slats and attach with screws. Finish the project by either varnishing or waxing.