 |
|
|
Desk Clock
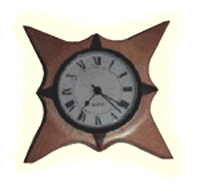
Desk or mantle clocks make ideal Christmas presents, especially for the uncle who already seems to have everything he could possibly need. The problem is that the typical clock design is rather boring, being a rectangular block of wood with a clock mechanism stuck on it. Of course, it doesn't have to be that way. The only basic factors for a desk clock are that it must tell the time, and that it must be able to stand on its own base. No one ever said that it must be square, rectangular or any other shape! With this in mind, we present this clock design not as a fait accompli, but rather as a starting point for your own creativity.
Construction
Tools required: jigsaw, sander, belt sander (or plane)
Wood list:
| Description | Wood Type | Qty | Thickness | Width | Length |
| Main spurs | Birch | 4 | 1 1/2" (38 mm) | 3 1/2" (89 mm) | 3 1/2" (89 mm) |
| Wedges | Cocobolo | 4 | 1 1/2" (38 mm) | 3/4" (19 mm) | 1" (25 mm) |
Note: this clock is designed to use a 3 1/2" (89 mm) clock face (with a 3" (76 mm) mechanism). These are readily available via mail order catalogs.
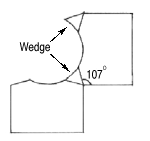
First, cut each of the spurs to the correct angle, so that when the spurs are glued together (with a wedge in between) they form a 90 degree angle (see diagram). Do not, at this point, cut out the main outline of the shape, nor the curve for the inner circle. These will be cut later, once all of the clock components have been glued together.
Once the spur angles are cut, cut the cocobolo wedges to the correct shape. These should be cut to an angle of 56 degrees and it is best to cut this as an even amount either side of the grain flow (ie, an angle of 28 degrees above and below the flow of the grain).
Glue the wedges and spurs together to form a large X shape. The best way to clamp this together is to use a belt-type clamp (which is designed to clamp irregular shapes together). Otherwise, use string tightly bound around the construction. Be very careful to ensure that the wedges sit in exactly the right position and that each combination of spur-wedge-spur forms a 90 degree angle.
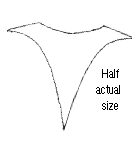
When the clock construction has dried, cut out the inner circle to fit the clock mechanism. Try to make this as tight a fit as possible. Then, draw out the shape of the spurs as a cutting guide. You can either use the template provide (see right) or come up with your own design. If you do elect to use your own creation, sketch out a quarter of the shape (ie one spur's worth) on paper and then use this as a template for the entire project. Doing this will help to form a regular shape, rather than allowing small inaccuracies to creep into the design. Once the design is to your satisfaction, use the jigsaw (or bandsaw) to cut out the spur shape.
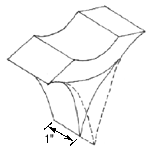
The next task is to angle back each of the spurs. This is to stop the clock from looking too flat and chunky. Using a belt sander or plane, angle back each spur so that it is only 1" (25 mm) thick at the spur's point, and still 1 1/2" (38 mm) thick at the point where the spur expands out to its full width (see diagram).
Now, decide which two spurs will act as the clock's feet and angle these back at an angle of 10 degrees. Be careful when doing this to ensure that each spur's front point remains sharp, while angling back from this to form flat feet. This angle is necessary because otherwise the weight of the mechanism will cause the clock to fall onto its face. Note: different clock mechanisms may be of differing weights and balances. As such, the angle of the feet may have to be adjusted accordingly.
Finally, sand down the entire project, rounding off the edges. However, try not to round-off the spur points when sanding. Then apply wax.