 |
|
|
Zen Rock Garden
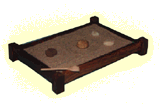
"Through Zen philosophy, one can experience the large in the small. And in a grain of sand, glimpse the meaning of the world." For centuries, Japanese Zen masters have practiced this philosophy by cultivating gardens of harmoniously-arranged rocks and raked gravel. This simple task reduces the day's complexities and helps you develop an inner calm and your own perspective on life. Now, not everyone has room for a full-size rock garden, and so these miniature rock gardens have become popular in the West. Unfortunately, these miniature gardens are usually mass-produced and rather dull in design, typically being four planks of wood and a piece of plywood for the base. With this plan we have tried to make the project slightly more ornate, while still adhering to a Zen-like simplicity (we hope). Apologies in advance to any Zen traditionalists...
Construction
Tools required: Sander, router. While not strictly speaking necessary, a miter saw (hand tool, not a power tools version) is very useful for cutting the desired angles. These are usually very cheap to buy ($30) and are well worth the money. We don't recommend a power miter because Cocobolo is quite a brittle wood and splinters easily.
Wood required (Cocobolo):
| Description | Qty | Thickness | Width | Length |
| Long sides | 2* | 1/2" (12 mm) | 1 1/4" (32 mm) | 11 3/4" (298 mm) |
| Shorter sides | 2* | 1/2" (12 mm) | 1 1/4"(32 mm) | 7 3/4" 197 mm) |
| Posts | 4 | 7/8" (22 mm) | 7/8" (22 mm) | 2 1/4" (57 mm) |
| Base (plywood) | 1 | 1/8" (3 mm) | 7 1/2" (190 mm) | 11 1/2" (292 mm) |
| Rake (birch) | 1 | 1/4" (6 mm) | 1" (25 mm) | 5" (127 mm) |
* It is better to treat these as one longer length, rather than two separate pieces, until you have shaped them (see below).
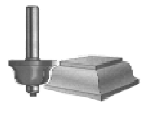
The first task is to shape the side and end pieces. This is done using a router with a curved bit, as shown on the left. Before using this router bit, mark a line 1/4" (6 mm) from each end of each piece of wood. Note that we recommend that you shape the sides and ends before cutting the into separate pieces, so it will be necessary to mark out not only the 1/4" lines, but also where the two distinct sides will begin and end on this plank of wood. These two lines must be drawn to signify at which point the routered shape must end as the last 1/4" at each end of both the long and short sides will not be visible in the finished project.
Once you have drawn these two lines, use the router to create the shape on both the long and short sides. Be very careful to route up to the 1/4" line, but under no circumstances should you go beyond this line. The finished shape should look something like the diagram on the right. If you do not have a router, you can shape the sides by using a sander to round off the edges, and while this will not look quite as effective, it still looks good.
Once you have routed out the desired shape, cut the two longer planks into the separate pieces (ie, two long sides from one piece and the two shorter sides from the other plank). Remember to cut the wood 1/2" (12 mm) longer than the shaped part of the wood -- ie 1/4"(6 mm) longer at each end.
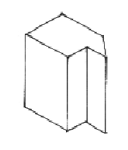
The side pieces connect into the four posts/legs. To connect the sides and posts together, a tongue and groove [[TK: Check this is the right name]] type of joint is used. Firstly, at a distance of 1/4" (6 mm) from each end of the side pieces, saw down to a depth of 1/4", cutting down into the front (ie shaped) surface of the side. Then, using a chisel, carve out the wood within this 1/4" by 1/4" area, thus creating a step (see diagram on left). Then, miter back the remaining 1/4" by 1/4" 'step' at an angle of 45 degrees. This is necessary because not only does the side piece have to join into the post, but it also has to sit flush against the next side piece that will be perpendicular to it.
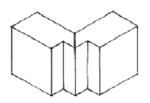
Imagine, for a moment, that there are no legs on this project. What we then have is a simple tray, where the sides are attached at a 90 degree angle to each other. All we have done is add the complication of slotting the post over the top of each of these joints.
One all four sides have had their ends cut to the correct shape, it is time to add a groove that will accommodate the base piece. Cut a 1/8" (3 mm) wide groove (and also 1/8" deep) into the inside (non-shaped side) of all four side pieces. This groove should be 1/4" (6 mm) from the bottom of the side.
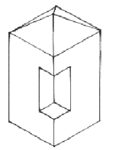
Once the groove has been cut, the side pieces are complete and it is time to build the posts. The top of each post forms a point and this is the first task that you should do. Mark a line 1/4" (6 mm) from the top of the post. Using this as the base line for the point, cut upwards at an angle of 30 degrees from all four sides. By doing this, you should end up with a point (see diagram on left). Once you have made the point for each of the four posts, check that each post is an identical height. If they are not the same, cut the longer ones down to side. If you don't do this, then you will end up with a Zen Rock Garden that wobbles...not the most soothing thing in the world!
Once satisfied that all four legs are the same length, you can begin work on making the post part of the post/side joint. Measure 1/4" (6 mm) down from the bottom of the point (ie from the line drawn previously) and mark. Then from this mark, measure down another 1 1/4" (32 mm) and make another mark. These signify the top and bottom of the slot that you will have to make. The slot should be cut into the side 1/4" (6 mm) in both directions (see diagram on right of the finished post to truly understand this).
Once the post is marked up, use a chisel to cut out the slot. Note: the most important measurement here is the height. If the distance cut in is slightly off, it will not matter too much, but is the slot is too long (ie from top to bottom) then the hole will be apparent even in the finished project. For this reason, only carve out a small amount at a time.
Once the posts are all complete, glue the sides to the base, and the posts to the sides. Clamp together and leave until glue is dry. Then, sand down the entire project using the various grades of sandpaper. We recommend staining the plywood to a dark color so that it matches the Cocobolo, especially the underside of the plywood. Then, wax the project. It is also a good idea to glue small pieces of felt to the underside of each corner post so stop the rock garden from possible causing scratches.
The rake

A Zen garden without a rake is meaningless and so it is now necessary to built a miniature rake. We used a small piece of birch for this as Cocobolo was considered to be too brittle. Besides which, we wanted a wood that was far lighter, thus creating a contrast with the main garden itself. Use the diagram (right) as a template and cut the rake out of the birch. Then, sand until it is a smooth shape.
The final ingredient
Once you have built the rake, all that is left to do is to add the sand and a number of pebbles. Make sure that you sieve the sand thoroughly so that it can be raked easily. If you are building this project as a gift, it is probably best to pack the sand into a sealable jar when you wrap it up, as most other ways of wrapping it will result in the sand escaping!