 |
|
|
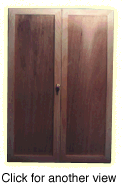
Chisel Cabinet
Chisels are one of the most valuable groups of tools you can own, and should be treated with care if you want them to last well. With this in mind, we offer this chisel cabinet as an ideal storage solution. The cabinet is designed to store both normal chisels and carving chisels. In addition, the plan can very easily be adapted to become a multi-purpose tool cabinet (more on this later).
Construction
Tools required: Drill, miter saw, jigsaw
Wood required: (Pine)
| Description | Qty | Thickness | Width | Length |
| Sides | 2 | 3/4" (19 mm) | 3" (76 mm) | 35 1/4" (895 mm) |
| Top and bottom | 2 | 3/4" (19 mm) | 3" (76 mm) | 23 1/2" (597 mm) |
| Back panel (plywood) | 1 | 3/16" (5 mm) | 22 1/2" (572 mm) | 34 1/4" (870 mm) |
| Chisel racks | 3 | 3/4" (19 mm) | 2 1/2" (64 mm) | 22" (559 mm) |
| Wall supports | 2 | 3/4" (19 mm) | 3" (76 mm) | 3" (76 mm) |
| Door frame sides | 4 | 3/4" (19 mm) | 1 1/2" (38 mm) | 35 1/4" (895 mm) |
| Door frame top/bottom | 4 | 3/4" (19 mm) | 1 1/2" (38 mm) | 23 1/2" (597 mm) |
| Door panels (plywood) | 2 | 3/16" (5 mm) | 9 1/4" (235 mm) | 32 3/4" (832 mm) |
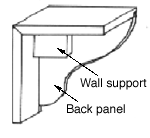
First, take the two sides, the bottom and top and cut to the correct length. This cut should not be a straight, vertical cut, but should instead be mitered at an angle of 45 degrees. By doing this, the point at which the side meets the top should form a 90 degree angle (see diagram) while hiding the back panel groove from the outside (see below).
Once all four pieces have been cut to size, make the back panel lip in all four pieces. This lip should be 1/4" (6 mm) deep, 3/16" (5 mm) wide and should be flush with the back of each piece. This lip should be cut on the inside of each piece (ie, the side which is shorter). Once the lips have been cut, glue and clamp the two sides, the top and the bottom together, remembering to also glue the back panel into the lip at this time. Ensure that the frame is square while it is clamped.
While the frame is drying, add in the four wall supports. These are square pieces of wood that fit against the back of the frame in each corner (in front of the back panel). By adding these supports you firstly ensure the squareness of the frame and secondly provide additional strength to the frame. To attach the wall supports, glue and screw from both adjacent side pieces.

Now that the frame of the cabinet is complete, it is time to build the chisel racks inside. Firstly, cut the three chisel racks to the correct length -- the inside width of the cabinet (22" - 559 mm). Then, decide upon the order of the chisels, and make each hole for a particular chisel. The best way to make the holes is to use a drill to make the initial round hole (in the center), as well as two smaller holes (one at each end), and then to use either a jigsaw or a chisel to cut out the excess in between (see diagram). Obviously, carving chisels have to be treated slightly differently, as the connection between the two small end holes and the central one will be a curve, not a straight cut, but the same jigsaw/drill combination works just as well.
Once all the holes have been cut out, attach the chisel racks to the cabinet frame. These racks should be glued and screwed through both side pieces, as well as a couple of screws through the back panel to ensure that the rack doesn't sag in the middle. Evenly space the three racks between the top and the bottom of the frame, unless one rack stores only small chisels, in which case this rack will require less space, leaving more for the other two.
Building the doors
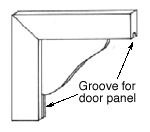
Cut the door frame components to size. When cutting the frame's sides, top and bottom, cut the wood at a 45 degree angle (not mitered -- see diagram) so that the sides, top and bottom fit together to form a 90 degree angle. Note that unlike the frame of the cabinet, the door frame is shallow (being 3/4" deep, and 1 1/2" wide). However, if you need additional space in the chisel cabinet (especially if you want to make it a more multi-purpose cabinet) you should consider replicating the approach used for the main cabinet frame, as this will allow you to store tools on the inside of the doors as well.
Once you have cut the frame to size, make a 1/4" (6 mm) deep groove along the inside edge of the door frame (ie the shorter side) that is 1/4" (6 mm) in from the back and 3/16" (5 mm) wide. This groove accommodates the door panel. Once all four frame pieces are ready, glue them together around the door panel. Clamp overnight, having first confirmed the squareness of the door. Repeat this process for the second door.
Sand down the doors and the main cabinet. Attach the doors to the main frame by using two piano hinges that run the entire height of the cabinet. Once the hinges are attached, it may be necessary to make to last minute adjustments to ensure that the doors close completely. Plane off any excess wood, but be careful not to take off too much.
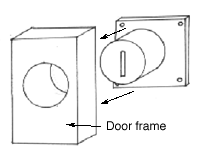
Drill out a hole for the lock in one of the two doors. Then attach the lock, screwing it into the back of the door (see diagram). Then add drop bolts to the top and bottom of the second door, drilling holes in the top and bottom of the cabinet to accommodate these bolts.
Note, when choosing which door should have the bolts, and which should have to lock, consider the organization of the chisels within the cabinet. Whichever side of the cabinet has the most commonly used chisels should be the side on which the lock is placed, as this is the side that will open first.
Sand the entire cabinet and then paint, or varnish to add a layer of protection.
Making the chisel cabinet into a multi-purpose tool closet
In order to make the chisel cabinet into a multi-purpose tool closet, simply increase the dimensions of it. In addition, increase the depth of the doors to allow for the storage of tools on the inside of the doors themselves. In addition to the type of tool rack described above (also suitable for screwdrivers) it will be necessary to add hooks of some form or other. The most simplistic solution is to use nails, and wrap electrical tape around them so that the nails cannot scratch your tools.