 |
|
|
Abacus Lamp
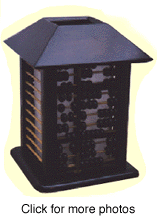
The point of this project was to design a low-light lamp that would provide interesting shadows through the use of two abaci (the plural of abacus?). However, these particular abacuses have sentimental value to my aunt and, while she certainly wanted to do something with them, she did not want them to be damaged. The result was this Chinese-influenced lamp, which allows the abaci to be freely removed. While you may not have any abaci yourself, the lamp is still easy to complete by either buying the abacus (often available in your local Chinatown) or by making your own (see the end of the project for more details). The wood used in this project was standard pine, stained to give a heavy Chinese feel (and to match the color of the abaci).
Construction:
Tools required: router, sander, drill
Wood required: (Pine)
| Description | Qty | Width | Thickness | Length |
| Pillars | 4 | 1 1/2" | 1 1/4" | 12 1/4" |
| Dowels | 22 | 3/16" | 3/16" | 6 1/2" |
| Pillar support bridges | 4 | 3/8" | 3/4" | 6" |
| Base | 1 | 11" | 3/4" | 11" |
| Vertical dowels | 4 | 3/16" | 3/16" | 12 1/2" |
| Dowel supports | 2 | 1/2" | 1/8" | 7 3/4" |
| Lamp shade | 4 | 4 1/2" | 1/2" | 11 1/2" |
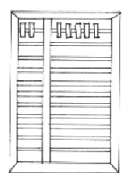
Begin the project by cutting the four pillars to the correct length (12 1/4") and then rout out a groove that is 1" wide and 3/8" deep into one of the 1 1/2" sides of each pillar. This side will be the one that fits against the abacus and allows the abacus to be slid in and out as required (a necessity as the abaci used in this project were family heirlooms). Once you have routed the groove, sand the pillar to slightly round off the edges.
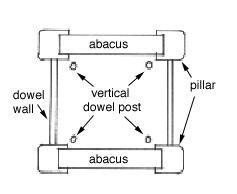
Now that you have made the grooves, position the four pillars as they will stand in the finished item (i.e. so that matching grooves face each other). Once the pillar are so positioned, mark the side that will also be a "facing side" (see diagram). This side will have the wooden dowels attached to it to provide a quasi-abacus look to the two walls that do not have real abaci on them.
Now that you have marked the dowel sides, drill 11 holes into these sides. Each hole should be centered on the width of the pillar (i.e. 5/8" from either side) and should be 1" apart from top to bottom (leaving a slightly larger 1 1/4" gap at the top). Each hole should be 1/4" deep and 3/16" diameter (the same as the diameter of the dowel).
Now that the basic components are ready, it is almost time to construct the "barred/doweled" walls. However, before we glue everything together stain the pillars and the four pillar bridge supports a dark color. We chose to use Jacobean (the darkest stain we could find), although any dark stain will suffice. The reason for staining the wood now is that we want to keep the dowels their natural light color. If we try and stain once the wall in complete, the stain will seep into the dowels at each end, thus ruining the effect.
Once the stain is dry, glue the dowels into the pillar holes, thus forming a "side unit" of two pillars with the dowels forming a wall between. At the same time, glue in the top and bottom pillar bridge support pieces. These do not need any special joint as the glue clamped under pressure should be adequate (there will be no weight put on these items - they are simply for decoration). When clamping, make sure that the unit is square.
While these two side units are drying, cut out the base wood, round off the edges and corners and then sand. One good way to round off the edges of the base is to use a curved router bit. However, if you do not have a suitable shape (these router bits are often quite expensive) then a heavy dose of sanding will provide a perfectly good finish. The base should then be stained the same color as the pillars.
Once everything is dry, position the two sides (with the abaci in position, thus forming a square looking from above) on the base and, when evenly positioned, mark the location of the four corner pillars. Then attach the pillars to the base by running screws through the base (from below) into the pillars. You should now be able to slide the abacuses in and out freely. However, at this point, be careful not to apply any side pressure to the walls. Because the unit is only attached at the bottom, it is currently very delicate and, if you are not careful, the walls may get bent outwards. This problem is dealt with later when we add the dowel supports.
To finish the base, we need to add the vertical dowels around which the rice paper is wrapped. Drill holes in each corner of the "inner" frame - see previous diagram - that are 3/16" diameter (the same diameter as the dowel to be used) and 1/4" deep. Then position the four 12 1/2" long dowels into these holes.
Then, take the two thin strips of wood - the "dowel support pieces" and place them above the dowels, screwing them into the four pillars. Ensure that the dowels are perpendicular to the base and support pieces and then drive a small nail through the support piece into the top of each dowel, thus stopping the dowels from moving. These support pieces also have the added benefit of strengthening the main unit so that, if the abacuses are removed, the structure is still strong.
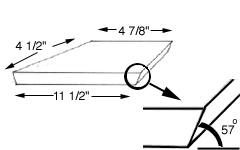
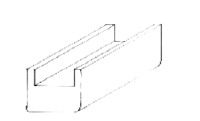
Now that the main unit is (almost) complete, it is time to build the shade. This is made of four pieces of wood, with a hole in the top, to funnel the light accordingly. Cut the four shade side pieces out as shown in the diagram. The base length of each piece should be 11 1/2", with the top length 4 7/8" and a height of 4 1/2" between top and base. The angled sides should be cut as shown at an angle of approximately 52 degrees, with a bevel of 33 degrees. Once cut out, glue the four together the form the shade. To clamp this awkward shape, we recommend wrapping tape tightly around the shade.
Once the glue is dry, stain the shade to match the rest of the unit. Then, varnish the lamp shade and main unit. Once the varnish is dry, drill a small hole through the base (somewhere near the center) to pass the electrical cable through and then wire up a bulb holder. For specific wiring details, please refer to a home improvement manual or, if in doubt, consult an electrician.
Finally, thread the rice paper around all four vertical dowels, using a little glue to adhere the paper to each dowel. We recommend an almond paste for gluing the rice paper (available from the craft store that sold you the paper usually).
Building an abacus
As mentioned previously, you should be able to pick up an abacus from any Chinatown. However, in case you do not live near one, here is a basic description of how to build an abacus.
Wood required: (pine)
| Description | Qty | Width | Thickness | Length |
| Sides | 2 | 3/8" | 1" | 12 1/4" |
| Top and bottom | 2 | 3/8" | 1" | 7 1/8" |
| Center divider | 1 | 3/8" | 1" | 11 1/2" |
| Dowel rods | 11 | 3/16" | 3/16" | 6 1/2" |
| Beads | 77 | 3/8" | 3/8" | 7/8" |
Cut the sides, top and bottom to size. Each end should be cut with a 45 degree miter. Drill holes into the inside of each of the two side pieces. You need to drill 11 holes, evenly interspersed (every inch). The hole should be 3/16" diameter and 1/8" deep. Once these holes are cut, drill holes all the way through the center divider that are in matching positions to the side holes (see diagram).
Before attaching everything together we recommend that you stain all but the dowels.
Thread the dowels through the holes in the divider. Feed the beads onto the dowels as follows: on one side of the divider, place two beads. On the other side, place five. Then, glue each end of the dowel into one of the side pieces (in the shallow holes you previously drilled). Then, glue to top and bottom pieces to the side pieces, as well as to the center divider (which should be positioned 2" from the left side). Drill a small brad nail through the top and bottom pieces into the center divider to increase its strength. Then clamp the unit until dry.