 |
|
|
Dovetail Joints (Manual)
In addition to the router-based method of creating dovetails, it is also possible to make these manually. The common misconception about dovetail joints is that they are very hard to make. They are not. However, making manual dovetails does take a considerable amount of time and patience when compared to the router-based method, although the satisfaction level is higher too!
The optimum slope of a dovetail joint depends upon the type of wood you are using. Softwoods should have a slope ration of 1 in 6, while hardwoods should have a 1 in 8 angle: that is one "unit" in from the side for every 8 units along the length of the wood. It is worth making a dovetail template to each of these proportions if you intend to make a number of dovetail joints. Not only will it speed the process up somewhat, but it will also ensure a uniformity between the joints.
1. Set the marker gauge to the thickness of the Tail wood, and mark this thickness all around the Socket piece. Then set the gauge to the thickness of the Socket wood, and mark all around the Tail piece.
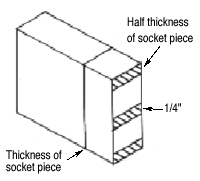
2. On the end of the Tail wood, draw a line across the end that is half the thickness of the socket wood. For example, if the Socket wood is 1" thick, this line will be drawn 1/2" in from the end of the Tail piece. Repeat this for the other end of the tail piece as well, so that you have a matching line.
3. Measure the distance between these two lines and subtract 1/4" for each pin, less one. For example, if you plan to have six pins, and the distance between the two end lines is 7 1/4", subtract FIVE (ie six, less one) 1/4" gaps. The result is 6". Then, divide this number by the number of pins that you want (in this case six) to ascertain the size of each tail (in this case 1"). So, what we now have is six pins, each 1" wide, with a gap of 1/4" in between each one.
4. Once these end lines have all been draw out, mark out the tail slopes (at either a 1 in 8 or 1 in 6 ratio, depending on the wood used).
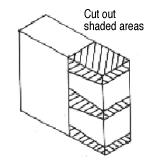
5. Saw out the tails. To do this, clamp the wood vertically, and at a slight angle so that the saw cut is vertical, rather than the wood itself. This makes cutting the desired angle far easier. If the saw cut moves slightly away from the desired angle, do not worry too much. Continue along the new line as it is more important to have smooth joints than it is to have them absolutely identical.
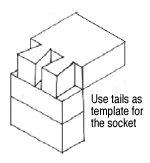
6. One the tails have been cut out, clamp the Socket piece vertically in a vice. Then, using the Tail wood as a template, mark out the shape of the Socket pins on the end of the Socket wood. Once this is done (and it must be very accurate), draw these lines down to the thickness line done in step 1.

7. Cut out the Socket pins, being very careful not to cut beyond the line. It is better to err on the side of caution, cutting just in the waster wood, and then neaten up the cut line with a chisel later. Once you cut into the good side of the joint (ie not the waste) then the joint won't work well.
8. Once the pins have been cut out it is time to glue the two pieces together. Before you do this, however, gently push the two pieces together and make any minor adjustments to the joint. Note that the joint should be very stiff and it is not advisable to push the joint completely together until you are ready to glue.