 |
|
|
Tenon and Mortise Joint

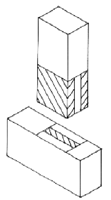
A tenon and mortise joint is one of the classic joints that every self-respecting woodworker should know. It is the fundamental joint that has provided the basis of more recent joints such as the finger joint. When reading the below explanation, keep in mind that the Tenon is the piece of wood that slots inside of the mortise (which has a hole cut into it that matches the size of the tenon).
1. Calculate the size of the tenon joint. The size of the tenon is the same as the width (not depth) of the mortise wood. So, if the mortise is 2" wide, the tenon will be 2" long. Mark all around the tenon.
2. Calculate the width of the mortise. As above, this hole is relational to the size of the tenon wood. If the tenon wood is 2" wide, then the mortise will be 2" long.
3. Mark out the width of the mortise. The width of the mortise is calculated as being 1/3 of the wood's thickness. Use a mortise gauge to mark both sides of this hole. Then, use this same measurement to mark the thickness of the tenon piece, thus reducing the risk of introducing an error.

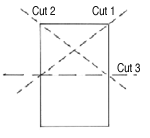
4. Once both pieces are marked out to your satisfaction, it is time to begin the cutting process. Use a tenon saw (obviously!) to cut the waste away from both sides of the tenon. Be very careful that you do not cut into the tenon itself. Although it is tempting to cut straight down into the tenon, a safer way is to cut at a 45 degree angle, as shown in the diagram, before finally cutting in a horizontal manner. Doing this reduces the risk of cutting into the tenon on the side furthest away from you (see diagram).

5. Cutting the mortise requires a little more delicacy. Start in the middle of the mortise and cut down with the chisel about 1/4". Then, move the chisel backwards about 1/8" and repeat the process; and so on. Do not move back all the way to the end of the mortise, but instead leave about 1/8" untouched at either end. Once you have done the entire length of the mortise, scrape out the loosened waste wood. Then begin again, cutting down another 1/4" and so on. Once you are down to just over half-way down into the joint, turn the wood over and start in from the other side.
6. Once the hole is made, clean up both ends, cutting back that extra 1/8".
7. Finally, glue the tenon into the mortise. If the fit is less than perfect, use small wedges to make it more solid (see diagram).