 |
|
|
Mission-Style Lamp

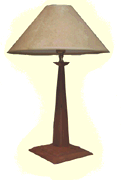
The majority of lamps that are available on the market involve the use of a lathe. However, turned lamps are not the only solution and, as this lamp proves, it is entirely possible to build an attractive lamp without any special tools whatsoever. This lamp is heavily influenced by the Mission-style, a style that is increasing in popularity at present. The lamp is very easy to make and the project can be completed in a weekend.
Construction
Tools required: Circular saw (or band saw), sander, drill
Wood required: (Cherry)
| Description | Qty | Thickness | Width | Length |
| Pillar Sides* | 4 | 1/2" (13 mm) | 2" (51 mm) | 13" (330 mm) |
| Small Base | 1 | 1/2" (13 mm) | 5" (127 mm) | 5" (127 mm) |
| Large Base | 1 | 1/2" (13 mm) | 7" (178 mm) | 7" (178 mm) |
| Top Platform | 1 | 1/2" (13 mm) | 1 3/4" (44 mm) | 1 3/4" (44 mm) |
* Note: The best approach is to cut these four side pieces out of one larger sheet of wood that is 8" wide.

The first step is to cut the four pillar sides to the correct shape. Each side piece should be 2" wide at the bottom, 1/2" wide at the top and 13" long. Each side should be cut at a 45 degree angle so that the four sides fit together snugly (see diagram). The easiest way to cut these sides is with a table saw. However, if you do not own a table saw you can use a circular saw or a band saw. To help clamp down the wood (which is fairly small) nail a sheet of plywood to the underside of the cherry and then clamp the cherry in place. When nailing the plywood to the cherry, you should only nail into the wood in the extreme 1/2" band at the top and bottom of the cherry. This is because the top and bottom 1/2" if the pillar is later trimmed off, thus removing all nail holes.
Once you have cut all four sides, roughly dry-fit them together (ie without glue). You will notice that there is no gap at the top through which the wire can fit. To resolve this problem, plane or sand off a 1/8" sliver from the inside of each side near the top (see diagram). The result should be a small hole through which the wire can be threaded later. Now glue all four sides together and clamp. The best way to clamp this pillar is to use electrical tape tightly bound around the pillar at the top, bottom and in the middle.
When the pillar is firmly glued, rim off the top and bottom 1/2" (thus giving a final height of 12"). By trimming off the top and bottom you should remove all nail holes that were made when cutting the sides to shape. Note that when cutting the pillar, the saw angle should be at 3 degrees (both vertically and horizontally) in order to counter the angle of the pillar. Sand the pillar, lightly rounding the corners.

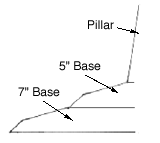
Next, cut the 5" base to size. All four sides should be cut at a bevel of 45 degrees. Once cut, plane or sand the top 3/8" of the bevel to an angle of roughly 20 degrees (see diagram) thus producing a two-angled side view (the actual angle should be based on a bevel that starts 3/8" from the top of the wood that cuts up towards where the base of the pillar will fit). This is an optional step and you may prefer to leave the base with just the 45 degree steps in order to have a more pronounced "mission" style.
Repeat the above step for the 7" base, ensuring that the rough 20 degree angle starts 3/8" from the top of the 7" base up to where the 5" base sits on top of it (again, see diagram).
Drill a 1/4" hole in the center of both bases for the electrical wire to pass through. Then, on the underside of the 7" base, rout a groove from the middle of one side to the center of the base (where the 1/4" hole is). This groove should be 1/2" wide and 1/4" deep and will accommodate the wire, allowing it to run out of the base towards the electrical socket. When cutting this groove, make sure it runs out to the least attractive side of the base (ie the rear side).
Now that you have prepared the two base pieces and the central pillar, position the pillar in the center of the smaller 5" square base and glue/screw the base to the pillar from the underside of the base. Then, glue/screw the larger, 7", base to the underside of the 5" base, ensuring that the smaller base in positioned centrally on the larger base. Set the resulting construction aside to dry.

Now cut the top platform to size. It should be 1 3/4" square, beveled at 45 degrees. Once cut to size, drill a 1/4" hole through the middle of it. This hole will accommodate the base structure of the lighting kit (see diagram) and therefore will vary in size depending upon the lighting kit used. Once the hole has been cut, glue the top platform onto the top of the pillar and clamp until dry.
Then, sand down the entire unit thoroughly and finish with your choice of wax, oil or other suitable finish. Once complete, wire the lamp as described within the instructions provided with your lighting kit. Note that the diagram shown here is only for illustration and should not be used as a basis for wiring your lamp. If you have any doubts, please consult an electrician.