 |
|
|
Mah Jong Box

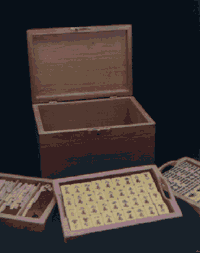
My parents-in-law have owned this Mah Jong set for several generations, but have never had a safe place to keep it. Instead, the pieces have been stored in a cardboard box that is in a rather decrepit state. Upon examination recently, it was agreed that the cardboard could no longer be repaired using tape and so I set about making this box. Of course, not many people want such a container, but it could also be used for jewelry or (if the dimensions are expanded) for silverware, sewing tackle or whatever. The options are seemingly endless. The box has five trays inside it.
Construction
Tools: sander, router
Wood required (Cherry):
| Description | Qty | Depth | Width | Length |
| Base box sides: | 2 | 1/2" | 5 1/2" | 10 1/4" |
| Base box ends: | 2 | 1/2" | 5 1/2" | 7 1/4" |
| Lid box sides: | 2 | 1/2" | 1 1/4" | 10 1/4" |
| Lid box ends: | 2 | 1/2" | 1 1/4 | 7 1/4" |
| Box top: | 1 | 1/2" | 7 1/4" | 10 1/4" |
| Box bottom: | 1 | 1/2" | 6 1/2" | 9 1/2" |
| Tray sides | 10 | 1/2" | 1" | 9" |
| Tray ends: | 10 | 1/2" | 1 1/2" | 6" |
| Tray base: | 5 | 1/4" plywood | 5 1/2" | 8 1/2" |
Building the tray

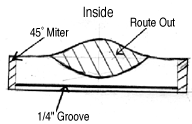
Cut all of the tray sides and ends to the correct sizes (see table above) and put a 45 degree miter onto each end. Then cut a groove 1/4" deep and 1/4" wide along the inside of each piece (the inside of the piece is always the side that is shorter -- with the miter working outwards towards the outside face) that is 1/8" above the bottom of each piece. This groove will be used to slot the base plywood into each tray. Because the box is quite deep, the trays need to have handles built into them in order to facilitate their removal from the box (Note: the very top tray DOES NOT have these handles -- see two paragraphs down). Take a tray side piece and cut it to the shape shown in the diagram (left). The highest point of this tray (ie at the top of the handle) should be 1 1/2", while the lower ends should be 1" high. Cut all of the side pieces to the same profile shape.

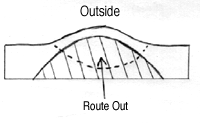
To make the actual handle shape (with the hole in the middle) use a router in the following manner. Clamp the end piece down securely, so that the inside of the piece faces upwards. Sketch out the curve shown in the above left diagram and then careful router this shape out to a depth of 1/4". Then, turn the piece upside down (so that the outside faces upwards) and route out the shape shown in the diagram on the right, again to a depth of just over 1/4". Where the two routed areas intersect, there will now be a hole, thus forming a handle. Sand the edges of these handles to form a smooth, rounded handle.
By routing out an area on the outside of each tray end, it allows space for the protruding handle of the underneath tray to slot in neatly, thus saving space and stopping the trays from rattling.
The one exception to this handle technique is the very top tray. Because it is the top tray, it does not require a handle and both the sides and ends should be 1" high.
Once all the handles have been routed, the shelves can be glued together. Remember to slide the base of the shelf along the groove at this time. Clamp each tray for several hours (preferably over night). No screws or nails should be used.
Once it is dry, sand the trays and then glue felt into each tray. For the top tray, add a couple of partitions by using some very thin wood. These partitions can be used as a way of picking up the top tray.
Building the box

Cut all the pieces together and miter the ends (construction of this box is done in the same way as for the trays, using miter joints). On the inside of the Base Box Sides and Ends, route out a niche along the bottom of each one. The niche should be 1/2" wide and 3/8" deep (see diagram on left). This niche will allow the base piece to fit snugly into the box, rather than sticking out underneath. Once this is done, glue the sides and ends together, as well as gluing the base into place and ensure that the box is square. Clamp over night to allow the glue to dry properly.
The lid is easier. Glue the sides and ends together and clamp the top piece on top of the sides (it is not sunken in). Again, clamp overnight. Once it is dry, sand the edges to create a smooth look.
Attach the top and bottom by using two very small hinges, sunken in to the top and bottom of the box. Then add a locking mechanism to the front to stop the lid from swinging open.
Finally, sand down everything and complete by waxing.