 |
|
|
Curved bedside cabinets
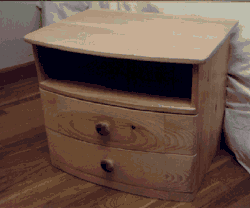
Most bedside cabinets are a rather dull design, being simply a box-like shape. When the below bedside cabinets were designed, we wanted to subtly change the shape and feel of the cabinets, but without removing any of the functionality.
The basic requirement was to provide two large drawers (for knickknacks of additional clothing), and a shelf area for putting extra books, or anything else that is considered a bedside necessity. In order to change the shape slightly, it was decided to make the front of the cabinet curved, rather than producing the more normal flat drawer fronts. Before anyone throws up their hands in disgust, thinking that we used some sort of steamer to bend the wood, don't worry...we cheated! No wood has been bent: instead, it has simply been planed and sanded into this shape.
Construction
Tools required: Plane (or belt sander), sander (for finishing), drill, jigsaw, circular saw (or router or some other device used for making a groove -- this tool is not completely necessary, as the groove can be avoided).
Wood required
| Description | Qty | Width | Length | Thickness |
| Main Unit | ||||
| Sides | 2 | 16" | 20" | 3/4" |
| Top | 1 | 18 1/2" | 24" | 3/4" |
| Shelf | 1 | 17" | 22" | 3/4" |
| Front base | 1 | 1 1.2" | 22" | 2 1/4" |
| Back panel | 1 | 21" | 20" | 1/4" (plywood) |
| Shelf runners | 4 | 3/4" | 14 1/2" | 1/2" |
| Draw Units | ||||
| Sides | 4 | 5 1/2" | 14 1/2" | 3/4" |
| Back | 2 | 5 1/2" | 18 3/4" | 3/4" |
| Front | 2 | 6 | 22 | 2 1/4" |
| Base | 2 | 14 | 19 | 1/4" plywood |
Note: the drawer unit quantities include the wood needed to build both drawers. Also, to create some of the widths described above, it will be necessary to join two or more planks of wood together: refer to the dowel joint in the Joints section.
The Main Unit
Firstly, the two side pieces should be cut to shape in the following way. The front edge of each side piece should have a notch cut out of it that is 3/4" deep and runs from the bottom of the side piece up to a height of 13 1/2" (see diagram on left). This notch is taken out to accommodate the drawers, thus ensuring that the drawers fit flush to the unit.
A groove should then be cut unto the inside of each side unit, from front to back, at a depth of 1/4". This groove should start 13 1/2" from the bottom of each piece and should be 3/4" wide. This groove is used to slot in the shelf (see joints section for more details on creating a slotted tenon joint).
Another slot should be cut, from top to bottom of each piece (again, on the inside) that is 1/4" wide and 1/4" from the back of each side unit. This slot is used to join the back piece of plywood onto the side pieces. To create this slot you will typically need a circular saw. However, this can be avoided by simply nailing the back piece onto the side units, rather than slotting it into place (not as nice, but if it saves you from buying a circular saw...).
Finally, nail and glue the shelf runners into place: the bottom of the lower runner should be 4" from the bottom of the side unit, and the lower part of the higher runner should be 10" from the bottom of the side unit. It is important to ensure that these runners are level (not sloping towards the front or the back) in order to ensure that the drawers work correctly.
It is now time to cut the top and the shelf to the correct shape. These should be curved on one side (the front) and flat on all others. The top should be 16 1/2" deep (from front to back) at the sides, but in the center it should be a total depth of 18 1/2". Mark out the two side depths, and the center depth and then sketch out a smooth curve between these three points. The easiest way to do this is to attach a length of string or cord to a pencil and then, holding the cord at one fixed point along the center line, draw the curve. Keep experimenting until the curve makes contact with both side marks, as well as the mark in the center. Once this curve has been sketched out, cut the curve using a jigsaw and then sand smooth.
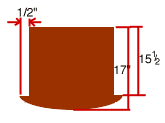
The shelf curve is the same proportions as the top (in order to match neatly). The side depths should be 15 1/2" and the center should be 17". Again, sketch out this curve and then cut, using a jigsaw. However, the shelf is slightly more complex than that and it is necessary to cut a long notch out of each side of the shelf. This notch should be 1/2" out of each side, and should run from the back to almost the very front of each side: indeed, up to a point level with the beginning of the curve (see diagram).
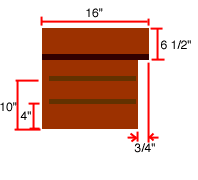
Once the shelf has been cut, it is time to make the Front Base unit. This is made out of a strip of wood 22" long and 1 1/2" wide. Note that this piece of wood is 2 1/4" thick (commonly made out of three pieces of 3/4" stock glued together. The idea is to make this piece of wood appear to be curved and this is done by planing (or band sanding) the wood into a curve that is the full 2 1/4" thick in the center, but only 3/4" thick at each side. As with the shelf unit, firstly sketch out the curve on the piece of wood. However, a jigsaw will not be able to cut this piece of wood and instead it should be planed into a curve. personally, I prefer to use a band sander, but whichever way you pick, this will take some time!
Once the front base is shaped correctly, all the components for the main unit are ready and it is now just a matter of gluing them together. Firstly, glue the shelf into place, followed by the front base unit. I recommend also screwing the shelf into place by placing a screw through each side piece (this screw hole can then be filled and will be fairly well hidden). It may also be necessary to use small square triangular pieces to help attach the front base to the side pieces. Once these pieces are in place, slide the back sheet of plywood into the back slot, and glue in place. Finally, attach the top piece, using dowels to attach the top to the side pieces.
The Drawer
Take the side pieces and mark one side of each one as being the inside to save confusion later. The outside face of each side piece should have a groove just over 3/4" wide cut into it, running along the length of each piece with the lowest point of the groove being 2" from the bottom of the side piece. This groove should be 1/2" deep and is for the shelf runners to slide into.
Each side and end piece should then have a 1/4" groove (1/4" wide and deep) cut into the inside face. This groove should be 1/4" from the bottom of each piece and is to slot the plywood shelf base into.
Once all of this has bee done, glue and screw the side pieces into the back piece. Note the side pieces should run the entire length of the drawer, with the back piece being sandwiched in-between (the total depth of the drawer from front to back, not including the drawer front, should be 14 1/2"). Once these have been glued and screwed, slide the plywood base into the groove and glue it in place. Ensure that everything is square.
To make the curved fronts of the drawer we use the same technique as was used on the front base. Mark the curve and then use a band sander to round off the wood. Again, the center of the drawer front should be a depth of 2 1/4" while the two ends should only be 3/4" deep.
Once this is done, it is time to attach the drawer fronts to the drawer units. To do this, slide the drawer into the main unit and then place the drawer front carefully on top. Mark the correct placement of this drawer and the glue and dowel into place. There should be just room for both drawer fronts to co-exist and it is important to be very accurate when doing this.
Once done, attach handles to the front of the drawers and then wax everything, with particular attention being given to the shelf runners.