 |
|
|
Chest of Drawers
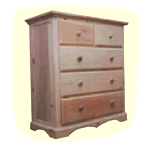
Building a chest of drawers is a surprisingly easy project and is well worth the effort as it means that you can build a chest that is large enough to fit all of your particulars in it. Typically, you can build this chest of drawers in a weekend, although you should expect the project to take a little longer if you intend to paint it.
Construction
Tools required: Router, sander, circular saw, drill, jigsaw
Wood required: (Pine)
| Description | Qty | Depth | Width | Length |
| Front/Back of unit | ||||
| Top and bottom planks | 4 | 3/4" | 2 1/2" | 33" |
| Side planks | 4 | 3/4" | 2 1/2" | 40" |
| Middle planks | 4 | 3/4" | 1 1/2" | 33" |
| Central strut | 2 | 3/4" | 1 1/2" | 8" |
| Front top edging | 1 | coving | 38 1/2" | |
| Front base edging | 1 | 3/4" | 3 1/2" | 37 1/2" |
| Sides of unit | ||||
| Side planks | 4 | 3/4" | 2 1/2" | 40" |
| Top and bottom | 4 | 3/4" | 2 1/2" | 14 3/4" |
| Middle plywood | 2 | 1/2" | 11" | 36 1/2" |
| Side top edging | 2 | coving | 18 1/2" | |
| Side base edging | 2 | 3/4" | 3 1/2" | 17" |
| Top of unit (ply) | 1 | 1/2" | 18 1/4" | 38 1/4" |
| Drawers | ||||
| Drawer sides | 10 | 1/2" | 6 1/2" | 15 1/2" |
| Small drawer back | 2 | 1/2" | 6 1/2" | 12 3/4" |
| Small drawer inner front | 2 | 1/2" | 6 1/2" | 12 3/4" |
| Small drawer front | 2 | 3/4" | 8 1/2" | 15 3/4" |
| Small drawer base (ply) | 2 | 1/4" | 13" | 15" |
| Large drawer back | 3 | 1/2" | 6 1/2" | 29" |
| Large drawer inner front | 3 | 1/2" | 6 1/2" | 29" |
| Large drawer front | 2 | 3/4" | 8 1/2" | 32 1/4" |
| Large drawer base (ply) | 3 | 1/4" | 15" | 29 1/4" |
| Drawer knobs | 8 |
The best way to approach building a chest of drawers is to break it down into a number of distinct tasks that can be attached together at a later stage.
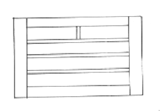
Building the front
The front of the chest is rather unimpressive, at least until you add the decorative trim at the end of the project. The side pieces are joined to the middle, top and bottom planks by using lap joints. Take one of the side pieces and cut out the following grooves to a depth of 3/8". Note that these grooves should be in the back of the side pieces. All grooves should be cut in 1" from the inside edge (see diagram for more explanation).
Measuring from the nominated top of the side piece:
- Cut from 0" (i.e. the top) to 2 1/2" (for the top plank)
- Cut from 10" to 11 1/2" (for the middle plank)
- Cut from 19" to 20 1/2" (for the middle plank)
- Cut from 28" to 29 1/2" (for the middle plank)
- Cut from 37 1/2" to 40" (i.e. the bottom, for the bottom plank)
Repeat this process for the second side piece. Then take the top, bottom and middle planks and cut out a groove that is 3/8" deep, 1" in from the side at each end of each plank. This allows these planks to fit snugly in the side pieces, without jutting out. Once this is done, glue and screw (from the back) the sides to the middle, top and bottom planks, ensuring that the resulting frame is square. Finally, glue the central support between the upper middle and the top support, equidistant from each side. This does not need a lap joint (there will be no pressure on it) but it is best to tack it into place with a small nail.
Building the back frame
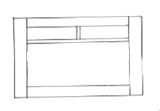
Construction of the back frame is far easier as there is no need for lap joints. Simply glue and screw the top, bottom and middle planks onto the front (i.e. the side that will be facing forward) of the two side pieces. Ensure that the resulting frame is square, and that it matches the dimensions of the front frame. Then glue and screw the central support to the top and middle planks so that it is flush with the side pieces (i.e. sits further back than the middle support).
Building the side frame
Take the side, top and bottom pieces and rout a groove along the inside edge of each one that runs the full distance of the plank, is 1/2" wide and 1/2" deep. Note that this groove is on the inside edge, on the inner side (i.e. the side that faces inwards). This groove is cut to allow the central plywood sheet to rest in it.
Next, cut a lap joint on the inside (i.e. the same side that had the groove routed in it) of the two side pieces. The lap joint groove should be 3/8" deep, the full width of the plank, and 2 1/2" from the end inwards. Then, cut a lap joint on the outer side (the side that does not have the routed groove) of the top and bottom pieces to match this lap joint. Glue and screw (from the inside) the top and bottom to the two side pieces, ensuring that the resulting frame is square. Then glue the plywood sheet into the groove that now runs all the way around the inside of the side frame.
Putting the frame together
Now that all four sides have been built, it is time to put it all together. If you intend to paint the chest, this can be done with screws. However, if you intend to keep the chest "au natural" then we recommend that you use dowel joints.
The two side pieces should be attached to the front and back frames, so that the total width of the project remains the width of the front frame, while the depth of the unit becomes the width of the side piece plus the depth of the front and back pieces. By doing this, the joint between the front and side is on the side of the unit, not the front, and is thus less obvious.
As you are attaching the four frames together, ensure that the unit remains square. Once you have attached all four, add the top plywood as this will help to strengthen the construction. The top unit should be positioned so that it overhangs the front by 1 1/2" (and therefore only overhangs the back by 1/2"). Glue and screw (or use dowel joints and small panel nails if you are not painting) the top to the sides, front and back. Clamp the entire unit until thoroughly dry.
Adding the decorative trim
To lessen the impact of the joint between the top and the main frame, we elected to use the type of coving that is typically used between a wall and the ceiling. This should be glued and tacked to both the top and the main frame. Not that to make the joint between the front coving and the side coving, we cut the coving at a 45 degree angle.
We additionally added a small strip of pine (1/4" tick) to the front and sides of the top in order to hide the plywood's "layer" edging.
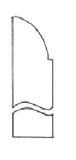
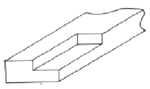
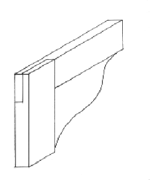
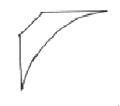
Along the base of the unit we added a decorative base that becomes the feet of the chest. When cutting the front and side pieces to shape, not that they should be cut with a 45 degree bevel so that they slot together neatly. First rout the top edge of each of the three pieces to produce a rounded look to the edging (see diagram). Next, sketch out the shape that you want for the front and side pieces and then cut out this shape with a jigsaw. Note that you should leave a minimum of 1 1/2" of wood at the thinnest part of the edging as this is the amount of overlap that there is between the edging and the main unit.
When you have cut the side and front pieces to shape you should attach them to the main frame. To do this, turn the main chest frame upside down as this allows you to work more easily. The edging strip should, as mentioned above, overlap the main frame by 1 1/2". To attach the edging to the main frame, glue and screw from the inside of the main frame outwards into the edging. Ensure that you attach the edging level with the main unit.
The main unit is now complete. All that is left is to sand it down thoroughly and then add the drawer runners (see later).
Building the drawers
Take the two side pieces, the back and the inner front piece. Cut a groove in each one that is 1/4" from the bottom of each piece and is 1/4" wide. This groove will allow the base to slot into the drawer frame. Once you have cut the groove, glue and screw the sides to the back piece, slot the base into the groove and then glue and crew the inner front board. Make sure that the unit is square. The result is a box without a lid.
Attach a 16" drawer runner mechanism to each side of the drawer, and to the corresponding "hole" in the main unit of the chest. Ensure that all drawer mechanisms are attached at the same height, so that the drawers are interchangeable in the unit.
Finally, you need to add the front of the drawer to the box unit. However, before doing this, you need to shape the front of the drawer. The edge of this should be rounded using the same router bit as you used for the edging around the bottom of the main unit. Once you have routed all four sides of the drawer front, attach it to the drawer unit by gluing and screwing from the inside of the drawer outwards. The front should be attached so that it overhangs the drawer unit by 1/2" underneath, and 1 1/4" above.
Finally, sand the entire unit thoroughly and then apply the finish of your choice.