 |
|
|
Cookbook Holder
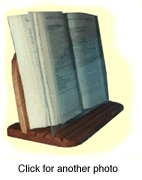
While the cookbook holder has grown in popularity, it has remained rather simplistic, almost boring, in design. When we set about building our own version of this useful tool, the main concern was to ensure that it was both practical and stylish. The result is a holder that owes far more to music stand design than to the current selection of cookbook holders available in the stores. But although the result looks rather nice, the construction is still very easy and the project can easily be completed in a weekend. Red Oak was used for this project as it matches the kitchen. However, any hard wood can be used (see the Wood Types section).
Construction
Tools required: jigsaw, circular saw, sander
Wood required: (red oak)
| Description | Qty | Thickness | Width | Length |
| Back: | 2 | 1/2" (12 mm) | 7 1/2" (190mm) | 8" (203 mm) |
| Base | 1 | 3/4" (19 mm) | 7" (178 mm) | 15" (381 mm) |
| Support: | 1 | 3/4" (19 mm) | 3" (76 mm) | 4 1/2" (114 mm) |
| Splash cover (Plexi-glass) | 1 | 1/8" (3 mm) | 12" (304 mm) | 15" (381 mm) |
The back is made from two pieces of red oak, glued together with a waterproof glue. Note that the grain runs vertically on this back piece as the project would be too weak if the grain were to run horizontally. Glue the two pieces together and clamp overnight.
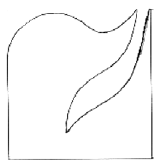
Once the back piece is glued, cut the bottom edge to an angle of 15 degrees. This is done because the back piece needs to be angled back slightly to ensure that the book does not fall forward. Once you have made this cut, sketch out the design shown in the diagram (right) and then cut this shape out using a jigsaw. Sand the back piece, making sure that you round off all the edges. The sanding is a little awkward in places and you will find that there is no substitute for hand sanding, as a power sander simply won't fit into the smaller gaps.
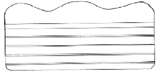
Next, mark out where the slots should be cut in the base piece. Note that these slots should be cut at a 15 degree angle, so that the plexi-glass will angle back parallel to the back piece. The larger slot is 1/2" (12 mm) wide (to accommodate the back piece) while the other four slots are 1/8" (3 mm) wide (the width of a circular saw blade and the plexi-glass), evenly spaced between the front and the 1/2" slot. All of these slots are a 1/4" (6 mm) deep. Before making the cuts, check one last time that the angle you have chosen will allow the plexi-glass to lean backwards, not forwards -- a very common mistake.
Once the slots have been cut, sketch out the overall shape of the base and cut using the jigsaw. The sand down the base piece, again making sure to round off all of the edges.
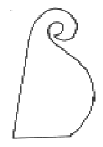
The final piece to make is the back support. Sketch out the shape shown and the cut out using a jigsaw. Note that once again, the back of this piece is angled at 15 degrees. Again, sand off taking attention on the edges.
Putting the pieces together could not be any easier. Screw the back support piece into the base, ensuring that the back support is aligned with the 1/2" slot for the back piece. Then, apply glue to the sloped side of the back support, as well as in the 1/2" groove, and then put the back piece in place. Clamp together overnight.
Waxing this project is not really the best solution, as you will not manage to protect inside the slots. Therefore, we recommend that you oil the cookbook holder.
Finally, cut out the piece of clear plexi-glass, and round off the top edges. Sand down the edges to smooth them.