 |
|
|
Trivet

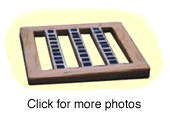
A trivet is a quick and easy project that can be used either in the kitchen or as part of a more formal setting in the dining room, depending on your needs. The project can be easily built from start to finish in a weekend (indeed in a day if you use fairly fast-setting glue). We used some left-over scraps of Cherry to build this trivet, but you can use any hardwood - particularly as the wood does not come into direct contact with the hot pots and pans.
Construction
Tools required: router, sander
Wood required: (Cherry)
| Description | Qty | Width | Thickness | Length |
| Sides | 4 | 5/8" | 3/8" | 5 3/4" |
| Middle strips | 3 | 5/8" | 3/8" | 5 3/4" |
| Edging strip | 4 | 1/8" | 3/8" | 5 3/4" |
| Tiles | 3/8" | 1/4" | 3/8" |

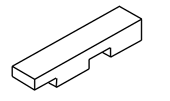
The first step in this project is to prepare the four side pieces. The easiest method of joining these sides together is to use lap joints, whereby one piece of wood sits on top of the other - overlapping it (see diagram). The lap joint should cut into the wood to a depth of 3/16" (half of the wood's thickness) and should cut back along the length 5/8" (the result, once both ends have been cut should be a "clean" 4 1/2" between each joint).

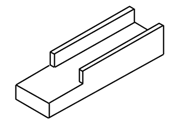
Once you have cut all of the lap joints correctly on the four sides, place the four pieces roughly in position. Choose the two (opposite) sides that sit over the top of the other two sides; these will be the sides that join into the middle strips. Mark and cut three slots that are 5/8" wide and 3/8" deep in the lower half of these two sides (see diagram). These three slots should be evenly spaced along the side (i.e. approximately 5/8" apart). Once you have prepared the sides, join them together with glue and a small screw (from the underside).

Now prepare the three central strips by cutting a lap joint in each end of them (again, 3/16" deep and 5/8" long). Then rout out a groove 3/8" wide and 3/16" deep along the upper side (the side that had the lap joint wood removed from it --see diagram). Note: the depth of this groove depends upon the thickness of the small tile squares: the tile should protrude above the height of the wood by at least 1/16". This groove should be positioned in the center of the piece (therefore leaving 1/8" on either side). Once this is done, glue and screw (again, from the underside) the three middle strips into the main unit, thus forming the completed shape.
Next add the small edging strip to the outside edge of all four sides with glue and clamp until dry. The purpose of this edging strip is to hide the unsightly lap joint ends. Once the edging strip is firmly glued in place, sand the entire unit and then wax or oil, depending on your preference.
Now glue the small tile squares into the grooves, ensuring that you evenly space them. We recommend a fast setting epoxy-type glue for this task (make sure that it is heat resistant!). Once dry, fill the gaps between the tiles with tile grout.
Finally, apply thin strips of felt to the underside of the trivet. This will have the double benefit of firstly hiding the evidence of the small screws and secondly ensuring that the trivet does not scratch your dining room table.