 |
|
|
Bird's Nesting Box
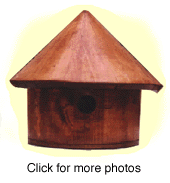
As winter descends upon us, it is time to skip ahead and begin considering the spring (it's certainly one way of ignoring the darker evenings!) In particular, now is the time to start building a bird nesting box so that when the spring does arrive, your local birds have a nice new home. By putting the box out in the winter, any human-related smells (such as the smell of the varnish) will have merged nicely into the more expected aroma of nature by the time the birds come knocking on the door.
Construction
Tools required: Sander (preferably belt sander), saw, planer (optional depending on type of saw used), jigsaw
Wood required: pine
| Description | Qty | Thickness | Length | Width |
| Main wall | 7 | 3/4" | 6" | 2 1/4" |
| Back wall | 1 | 3/4" | 10" | 8 1/4" |
| Roofing tiles | 15 | 3/4" | 9 1/4" | 1 3/8" |
| Base (plywood) | 1 | 1/2" | 9 3/4" | 5 1/2" |
| Perch | 1 | 1/4" | 2 1/2" | 1/4" |
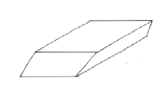
Begin the construction by cutting the mail wall pieces to shape and size. Each piece should be 6" long, with a 45 degree miter at one end (the end that will connect to the roof). In addition, when ripping the width of the wall pieces they should be cut at an angle of 15 degrees down each side in order to make the "curved" effect (see diagram).

Once you have cut the seven wall pieces to shape, cut out the back wall unit. This piece, as seen in the diagram (left), has straight sides up to a height of 6" and then angles up to a point at a 45 degree slope. Note that near the apex of this slope, the wood is mitered to a 45 degree angle to allow the roofing tiles to lie flat.
Now that you have cut out the main and back wall pieces, glue the unit together. Note that the back wall fits inside the main wall curve. Once all pieces have been applied with glue and are resting in place, clamp with a band-styled clamp. If you do not have one of these, wrap masking tape around the entire unit several times to make a strong, tight, bond.
Once the unit is dry, remove the tape and sand the wall until it forms a smooth curve. It is easier to do this with a band sander, but with a little patience, a standard sander will suffice. The result should be a smooth, semi-circular hut.
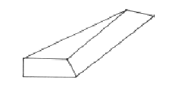
Now cut out the roofing tiles to shape. These should be cut at an angle of 12 degrees so that they start as a point and finish 1 3/8" wide at the end of the 9 1/4" length. At the same time, these pieces need to be cut at a miter of 12 degrees on one side only (or at an angle of 6 degrees on each side if so desired) so that they follow the curve of the hut wall. Note that you can make this miter either by using a miter saw, or by using a hand planer.
Once these have been cut to shape, dry fit them to ensure that they match the roof and make any necessary modifications. Then, apply glue and place the roofing tiles in place. To clamp, wrap masking tape around and around the unit to hold it firmly in place.
Once dry, remove the tape and sand the roofing tiles to form a smooth, rounded roof.
Now, drill a hole 1 1/2" in diameter to form the doorway to the nesting box. Note that different species of bird need different doorway sizes. If you are attempting to attract a particular type of bird, please consult a birdwatcher's book to ensure that you cut the correct size of hole. Next, drill a small hole, 1/4" in diameter just below the main hole. Push the small dowel that forms the bird perch into this hole and glue it into place. Drill another 1/4" hole near the top of the back wall of the house. This is used to hook the house onto a nail that is in a tree.
Next, cut the base of the nesting box to shape. To do this, simply draw around the base of the unit and cut out using a jigsaw. To attach the base to the main hut, use three screws (one in the middle at the front and one in each back corner). Do not use glue as you will need access to the bird hut in order to clean it out once in a while.
Finally, stain the nesting box to a darker color and varnish it to add a layer of protection.