 |
|
|
Japanese Style Lamp
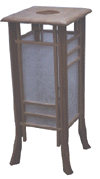
It has been said that beauty comes from simplicity. If so, then this lamp is a classic example. It has a delicate appearance and looks difficult to make, while it is actually very simple to construct and should take no longer than a weekend to complete from beginning to end. The result is an appealing lamp that makes an excellent gift. And what better time to make one than just before the holiday festivities!
Construction
Wood Type: Cherry.
| Description | Qty | Width | Thickness | Length |
| Legs | 4 | 1 1/2" | 3/4" | 17" |
| Inner verticals | 8 | 1/4" | 1/4" | 14" |
| Inner horizontals | 8 | 1/4" | 1/4" | 5 1/2" |
| Inner cross beams | 8 | 1/4" | 1/4" | 3 1/2" |
| Top | 1 | 7 1/2" | 1/2" | 7 1/2" |
| Lamp connector | 1 | 1" | 1/4" | 6" |
| Triangles | 8 | 1/2" | 1/4" | 1/2" |
Building the inner frames
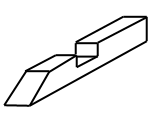
1. Take the eight inner verticals and cut a niche out of each vertical 2" to 2 1/2" from the top and bottom of each length. This niche should be 1/8" deep (see diagram).
2. Take the eight inner horizontals and cut a niche out of each horizontal 1/2" to 3/4" from each end. Again, the niche should be 1/8" deep.
3. For each of the eight horizontals, cut each end to a 45 degree angle so that the shorter side is the side that has the niches in them from step 2. (See diagram).
4. You can now join the verticals and horizontal pieces together at the point where the niches have been made, forming a rectangle with protruding ends. Glue this unit together.
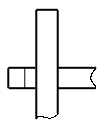
5. Glue the two inner cross beams into the rectangle (step 4), spaced 1" apart form one end of the triangle (see diagram). Clamp overnight.
6. Once the inner frames are glued, attach the rice paper to the inside of each rectangle (this is the longest dies (i.e., without the 45 degree taper showing). To glue the rice paper onto the frame, lay the rice paper down on a flat surface, smear glue onto the frame and then press down on the paper. Place several books on top of the frame and leave overnight until glued. Then trim the rice paper to fit.
Building the legs
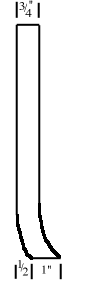
7. Cut the legs to shape (see diagram). Note that the inside curve of the leg begins 3 1/2" from the bottom of the plank. Any higher and it would interfere with the attachment of the inner frame.
8. Once cut to shape, cut out two niches, 1/4" wide, 1/4" deep, 2" to 2 1/4" from the top and 11 3/4" to 12" from the top, on the inside of each leg. This niche will be used to connect the inner panels to the legs. Check these measurements carefully, in case you made any slight variation to the previous cuts/dimensions.
9. Sand the legs, rounding their edges a little.
Joining the frame to the legs
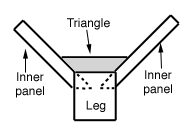
10. Before joining the panels to the legs, cut out eight small triangles of wood, 1/4" thick, with two (perpendicular) sides 1/2" long.
11. Glue the inner panels into the leg niches. Use the small triangles cut out in step 11 to strengthen each joint (see diagram).The best way to clamp the lamp is to use rubber bands or string.
12. Once the glue is dry, attach the lamp connector to the base of the two of the inner frames using small, thin screws. However, before attaching this piece to the frame, drill a hole for the bulb holder and wire the unit.
Building the lamp top
13. The top is a square piece of wood 7 1/2" x 7 1/2". Round the edges of the top to suit your personal taste.
14. Drill a 2 1/2" hole in the center of the top. This will allow the light to shine upwards, as well as allowing the heat to dissipate more effectively.
15. Finally, attach the top to the legs by drill small holes into the top of each leg (and matching holes in the underside of the lid) that will accommodate small dowels. These will hold the lid in place. However, do not glue the lid in place -- you need to take the lid off to change the light bulb.