 |
|
|
Bird Feeder
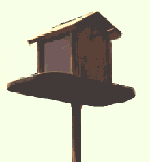
This month, Amateur Woodworker features the first of two styles of bird feeder (the second will be published next month). This particular feeder is designed to take bird seed, rather than the more typical left-over food scraps. The advantage of this style is that it can be filled up infrequently as it can store several weeks worth of food at a time. The bird feeder is made out of pine and is stained to suit its locale.
Construction
Tools required: jigsaw, drill
Wood list (Pine):
| Description | Qty | Depth | Width | Length |
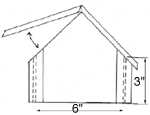
| Sides | 2 | 3/4" | 6" | 6" |
| Roof parts | 2 | 3/4" | 5 1/2" | 7" |
| Base | 1 | 3/4" | 8" | 12" |
| Corner pieces | 4 (dowel) | 3/4" | 3/4" | 4" |
| Pole Stoppers | 2 | 3/4" | 3" | 3" |
| Pole | 1 (dowel) | 1 1/2" | 1 1/2" | 6' |
| Plastic glass | 2 | 1/8" | 2 7/8" | 6" |
| Hinges | 2 | 1/2" deep |
Firstly, the four corner piece must have a quarter of the length cut out. The easiest way to do this is to clamp the corner piece in a vise and saw along the length until the saw cut is half way through the pole. Then rotate the corner piece by 90 degrees, re-clamp, and then cut through again until the waste quarter is loose. Repeat this procedure for all four corner pieces.
Glue a corner piece to each end of the side piece, ensuring that the base of the corner piece is aligned with the base of the side piece. However, there must be a thin gap between the corner piece and the end of the side piece that will allow the plastic glass to slot in (see diagram).
Once this is dry cut the side pieces to the correct shape for the roof. The roof should be at a 45 degree incline, reaching to a point in the middle.
Now cut the roof pieces to the required size. The apex of the roof should be angled by 45 degrees so that the two roof pieces rest snugly against each other. Then attach two small hinges between the two rood pieces (cutting a small slot so that the hinges do not cause a large gap between the roof pieces).

Cut the base piece to the desired shape (I find that an irregular shape works well, rather than trying to cut a geometrically-pleasing shape). Cut a hole in the middle of the base piece that is just large enough to accept the main pole.
Now it is time to fasten everything together. Slot the plastic glass into each end of the side pieces and attach this four-walled construction to the base by screwing up from the underside of the base (two screws in each side piece should be adequate). Then rest the roof on top of this construction, and screw one side of the roof into the side pieces. The other roof side is obviously not attached as this should hinge up to allow for the bird food to be added.
Then, wedge small pieces of wood into the base of the gap along which the plastic glass slides. This is done to create a gap between the base and the plastic glass, through which the bird food will spill out onto the base.
Finally, stain the wood to the desired color and varnish.
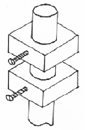
To attach the main pole, make a hole in the pole stoppers that is just large enough to accept the pole. Then place one pole stopper on each side of the base hole, and pass the main pole through these three pieces. Screw through each pole stopper into the main pole and this adequately fix the pole to the base (see diagram).