 |
|
|
Basic Entertainment Center

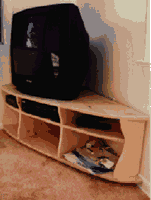
This entertainment center is a rather primitive affair, as it is an "open-plan" design with no doors. The philosophy behind this decision was that by leaving the design open I would be less tempted to simply throw any old junk into center's hidden recesses. This design also allowed me to employ a curved design, rather than the more typical straight edges, and this reduced the unit's presence in the room -- as the room is rather small, this was deemed to be very important.
Construction
Tools Required: Jigsaw, drill, circular saw (preferable but not necessary)
Wood Required (Pine):
| Description | Qty | Depth | Width | Length |
| Top | 1 | 3/4" | 26" | 48" |
| Base | 1 | 3/4" | 26" | 48" |
| Middle | 1 | 3/4" | 26" | 48" |
| Left end support | 1 | 3/4" | 26" | 13 1/4" |
| Middle supports | 2 | 3/4" | 26" | 13 1/4" |
| Right support | 1 | 3/4" | 12" | 13 1/4" |
| Feet | 4 | large wooden, rounded door knobs |
Note: to create the widths needed for the top, middle and base pieces, you will need to glue and dowel two pieces of pine together.

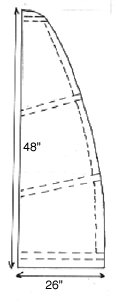
Using the diagram as a (very) rough template, sketch out the final shape of the top on the 48" x 26" piece of wood. To give a basic idea of the size, remember the above dimensions for the left and right supports, and note in the diagram that the top piece curves sharply close to its right end, just past the final support. Once you are satisfied with the shape of the top, use a jigsaw to cut out the shape, and then sand down the edge to a smooth finish. Once the top is cut to a smooth shape, use it as the template for cutting out the base piece, which is exactly the same size and shape.
The middle piece should be indented one inch when compared to the top and the bottom. To do this, use the top piece as the template and draw the size of another (equally large) piece on the wood allocated for the middle. Then, draw a new line on the middle piece that is indented one inch from this first "top" line. The resulting inner line is the correct size of the middle piece and this too can now be cut and sanded to shape.
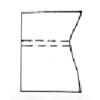
Next, the four support pieces should by cut to shape. The prerequisites for the shape of these are that they should be flush with the front edge of the top and bottom pieces, as well as with the smaller middle piece. Because of this, the final shape of the supports becomes a curved shape as shown in the diagram (see left). The depth of these supports varies, depending upon which support it is. The right and left support depths is relatively easy to gauge as it is a perpendicular line drawn from the back of the unit, 1 1/2" in from each side. The middle two supports, however, are perpendicular to the front, curved angle at the point at which the curve meets the support (see top diagram). It is therefore necessary to calculate where these middle two supports must be positioned before their depth can be agreed upon.

The position of the middle two supports should obviously straddle the central point of the center (so that the unit looks balanced). To determine how large a gap should be allowed between these two supports is determined by the width of your particular VCR. Measure the width of your VCR and add at least one inch to this dimension (2" would be preferable) to allow free circulation around the machine. Use this dimension to decide where the two supports should be located (measure at the front of the unit) and then project back a perpendicular line from this point until it reaches the back of the unit. You can now cut the supports to this depth.
Once all four supports have been cut to shape, they can be screwed and glued to the base of the unit. Having done this, the middle board should then be cut into three pieces; one for each of the gaps between the supports. Once cut to shape, they can be glued at an appropriate height to form the VCR/cable TV shelf. To determine the correct height for this shelf, measure the height of the VCR and the cable box. Add a minimum of 1" to the height of the tallest device and use this as the height of the shelf. Note that all three middle shelf units should be attached at the same height. To attach the middle shelf units to the supports, a combination of screwing and gluing can be used as follows. Firstly, glue and screw the central middle shelf into place. It is important to do this shelf first as starting at either end can bring a greater inaccuracy into the measurements. Furthermore, this is the shelf that will take the most weight and should therefore be screwed at both sides. Next, attach the left-hand-side middle shelf. To do this, screw and glue though the left support and simply glue onto the middle support. It is preferable to also use a couple of dowels into this middle support, as this will make the unit much stronger. Clamp this shelf in place overnight to ensure that the glue bonds sufficiently. The next day, repeat this exercise for the right-hand shelf.

Once all the glued joints are dry, the clamps can be removed and the top piece added. Do not use screws to hold this in place as we wish to keep the top of the unit "pure". Instead, just glue and clamp. Once the glue has bonded, the unit can be given a final sanding and may then be waxed. Waxing is preferable to varnish on a project such as this for a number of reasons. Firstly, most furniture polish helps to improve the shellac overtime; the wax helps the wood to age more naturally over time; most importantly, a unit such as this is likely to get scratch (TVs get moved and so on): it will be easier to sand and re-wax scratches than it would be the sand and try and match the varnish (and, of course, varnish takes far longer to dry!)