 |
|
|
Carved Owl Coat Hanger

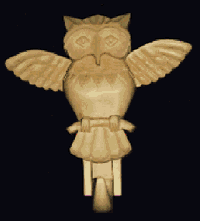
The owl is a departure from Amateur Woodworker's normal type of project in that it involves carving rather than the more usual woodworking skills. However, it is still in keeping with AW's philosophy of needing just a handful of tools. In fact, if anything, this project requires less power tools than normal, although a couple of carving chisels will certainly help things along. The carved owl is a variation on a traditional Russian design and can be used as an ornament, or as a functional coat hook.
The beauty of building such an owl is that there is not necessarily a right and a wrong way of completing it. This particular owl, for example, is a variation of one I saw published several years ago. I didn't like the final finish of the original, nor did I agree with the level of detail provided, so I modified to fit my own taste. The wood used for this particular owl was Lyme -- perfect for carving -- although redwood can also be used.
Construction
Tools required: Carving chisels (two: one for taking off lots of wood and a much smaller one for the finer detail), sander, jigsaw, router (not necessary).
Wood required (Basswood or Lime recommended):
| Description | Qty | Depth | Width | Length |
| Body | 1 | 2: | 5 1/2" | 13 1/2" |
| Back of head | 1 | 3/4" | 5 1/2" | 3 1/4" |
| Hook | 1 | 1 1/2" | 4" | 7 1/2" |
| Back of hook | 1 | 3/4" | 2 3/4" | 2 1/2" |
| Wings | 2 | 3/4" | 3 | 6 3/4" |

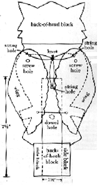
Using the plans, mark out and cut to shape all of the pieces required. Then, mark out the pattern on the wings and on the main body using carbon paper (or freehand sketch). Once all patterns are sketched out, glue and clamp the back of head block to the main body.
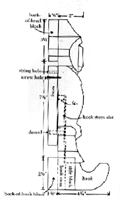
With a router, cut out the groove (1/2" x 1 1/2" x 7 1/2") on the back of the owl's body. This slot is to accommodate the hook.

Carve the hook into a suitable shape (again, there is no right and wrong with this, but use the photo and plans as a rough guide). Once carved, test to see that it runs smoothly along the slot. If is doesn't run smoothly, sand or plane down until it does. Once complete, glue and clamp the back of hook piece.
Clamp down the owl body and begin carving out the main body shape. First roughly carve out the main contours, and then shape down into a smoother finish. I find that the easiest way to work on the body is to split it into three distinct sections: the head; the center body; the feet and tail feathers. By so splitting up the project, it is easier to concentrate on getting one part done before your mind wanders onto the next part. You may find it useful to route out along the contour for the head and the feet before you begin the main carving.

Once the body is complete, carve the wings. Note this takes more care because you are carving across the grain, rather than with it. Once complete, place the hook stem and wings in the appropriate positions. Drill a hole though the hook stem for the 1/4" dowel and another (1/8") for the string screw. Drill two corresponding holes through each wing for screw and string.
At this point, wax (and stain if so desired) all parts of the owl.
Set up the string arrangement as shown in the diagram. Thread string around each of the string screws. Glue dowel into hole in hook stem. The dowel should stick out approximately 1/4" and is used to stop the hook from falling out of the slot.
Finally, drill a hold in the back of head block to allow the owl to be hung.