 |
|
|
Picture frame
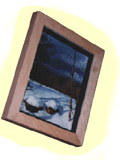
The idea behind this picture frame was twofold.: the main goal was to build a frame that did not detract from the photo held within it (in this case a landscape shot). The second goal was to try and portray a sense of depth to the picture. The first goal was easily attained by using solid hard maple to create a strong feel to the frame and the second goal was attained by leaving space between the glass and the photo.
Construction
Tools required: router, sander, saw
Wood required: (hard maple)
| Sides | 2 | 1 3/4" | 1 3/4" | 18 1/4" |
| Top/bottom | 2 | 1 3/4" | 1 3/4" | 15" |
| Inner sides (edging) | 2 | 3/4" | 3/4" | 15 1/4" |
| Inner top/bottom (edging) | 2 | 3/4" | 3/4" | 12" |
| Back (plywood) | 1 | 12 1/2" | 1/4" | 15 3/4" |
Construction
First, take the sides, top and bottom and cut to shape. Each end of the items should be cut to a 45 degree angle so that when placed together they result in a frame.
Once cut to size, rout out a groove on the inside (back) edge of each piece. This groove should be 1/2" wide and 1 1/4" deep (thus leaving a thickness of 1/2" remaining from front to back). Note that Hard Maple is, like its name would suggest, a hard wood. Therefore rout out this groove gradually taking many sweeps through with the router. If you are impatient and try to take too much off you'll end up ruining a perfectly good router bit! At this point, glue the four frame pieces together and clamp overnight. If desired, you can use very thin panel pins to nail the items together, although wood glue alone should easily suffice.
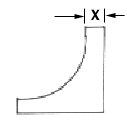
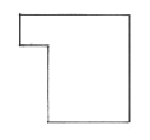
While this outer frame is gluing we will build the inner sub frame. This sub frame is made out of edging wood (see diagram for cross profile) that is available at most home improvement stores. As with the outer frame, cut the pieces to size with 45 degree miter. Plan before you cut so that the four pieces result in a frame. This inner frame will sit under the main frame (see cross profile diagram). Note that the exact size of these pieces should be the length of the space available within the hole of the main frame, plus the measurement marked as "X" on the edging piece (as this is the amount that the inner frame sits inside the outer one).
Once you have cut these items to size, clamp and glue overnight. Once dry, sand this inner frame and then paint it matte black to give a more subtle illusion of depth.
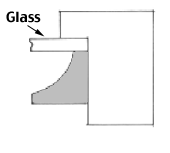
Have a piece of glass cut to fit inside the outer frame and then place this in the frame. On top of the glass, add the inner sub frame. Then, add the photo that you want to use. Finally, add in the back sheet of plywood and use small panel nails tacked into the inside back of the main frame to hold the construction together.
Finally, attach picture frame wire between two small screws, one in the rear of each side piece, so that you have a means of hanging the picture.