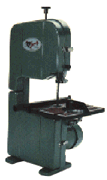
$200 upwards
The band saw has developed a reputation as being the saw of choice whenever you need to cut a curve. In many respects, you can view it as a grown-up bayonet saw. However, to say that the band saw is only suitable for curve cutting is to typecast a very versatile saw. The band saw is capable of performing a whole range of cuts, such as ripping, cross cutting, beveled cuts and, yes, curves. The band saw is also capable of re-cutting -- cutting a thick board into several thinner boards.
What makes the band saw even better is that it is a relatively safe saw. Only a small portion of the blade is visible -- the rest is hidden away in the machine's casing -- and the blade cuts downwards, pushing the wood onto the base rather than pulling against it.
The band saw is named after its saw blade, which is a continuous steel loop with teeth along one edge. Various widths of blade are available -- typically from 1/8" to 3/8" or even wider. The thinner blades are better for cutting curves, although they are more likely to break. The wider blades are preferred for cutting straight lines.
When buying a band saw, consider the following:
The band saw can be used for cutting both curves and straight cuts. For all cuts, you should set the blade guard to a height that is just more than the height of the wood. Leaving too great a gap between the wood and the blade guard will lead to the blade meandering.
Cutting curves
Mark out the line of the curve that you wish to cut along. Feed the wood through the blade slowly, without forcing the wood against the blade. Let it push through gently. Cut slightly on the waste side of the line.
If the blade begins to bind against the wood (i.e. slows down) do not stop cutting. The binding is caused by trying to cut too tight a curve. Make the cut more gentle by running out through the waste wood and then, once you have cut through to the edge, begin again. In this way, you can cut out the "flowing" curve by making a number of more shallow cuts, rather than one long cut.

Of course, the above technique assumes that the cut you are trying to make is convex. If you are cutting a concave curve, you cannot run out through the waste. The best approach here is to make a number of straight cuts through the waste wood to the edge of the line, prior to beginning the curved cut (see diagram). That way, as you cut the curve, the waste wood will fall away in sections, reducing the risk of binding.
If the above technique is unsuccessful and the blade binds, switch off the power and slowly ease the blade out of the work. Then begin again.
Ripping wood
Before beginning to rip the wood, make sure that the tension of the blade is correct. Further, ensure that the blade guides are set correctly and that the blade is sharp. If any of these factors are not correctly set, the blade will have a tendency to meander, rather than cutting straight.
To rip the wood, use a rip fence and gently push the wood through, applying pressure that will gently move the wood through the blade while also keeping the wood firmly against the rip fence (pushing at a 45 degree angle to the forward direction works best so that the pressure is evenly distributed between forwards and the rip fence).
Always keep your hands clear of the blade when coming to the end of the rip.