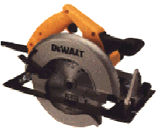
$130 upwards
Circular saws are great for cross cuts (cutting across the grain) on large or thick planks of wood, as well as for ripping (cutting along the grain). Circular saws are fairly accurate when used freehand (without a guide) as the size of the blade keeps the tool roughly on the straight and narrow. Because of this, the circular saw is a favorite for quick cuts when accuracy is not an issue.However, the saw can also be used for more accurate cuts by using a guide or fence to make sure that it stays on the correct path. Furthermore, when you need to cut a beveled edge (i.e. an angled edge) the circular saw is often your best bet.
To make the circular saw a truly versatile tool, consider purchasing the table saw attachment for your workbench (if your workbench support this option -- WorkMates typically do). This allows you to fix the circular saw upside down so that it acts as a cheap table saw.
When looking to buy a circular saw, consider the following:
You should always use two hands when operating a circular saw. One handed operation is both dangerous and will cause inaccurate cuts.
Clamp the wood to your workbench. Mark the line that you wish to follow and line up the sight on the front of the saw with this line. With the front of the base resting on the wood (but with the saw blade not touching) start the saw. When the saw comes up to full speed, slowly move the saw forward, keeping the sight lined up with the cut line.
Do not try and force the saw through the wood, but instead gently maintain a forward motion. As you move the saw through the wood, the saw guard will automatically raise up to allow the blade to cut through the wood. Do not manually lift the guard by putting your hand close to the saw guard. If the guard does not lift up as expected, consult your manual.
Ripping
Ripping is performed in the same manner as crosscutting (described above) with the exception of the supporting material to be cut. If the material is supported on a large table (or the floor) several pieces of scrap wood should be placed underneath the wood. This scrap material should be at least 1" thick in order to ensure that the saw's blade does not cut through the surface below.
For narrow rips, use the rip guide (fence) that usually comes with the saw or can be purchased as an optional extra. For wider cuts, such as in plywood, clamp down a long metal rule (at least 1/4" thick) or a straight piece of wood as a guide.
Before you begin cutting, adjust the saw's depth of cut so that the blade is well clear of the underneath surface (the floor or workbench). Also ensure that the power cord is free and clear of the cut area.
Bevel Cutting
Bevel cuts are performed in the same manner as crosscuts and rips. However, you should be particularly careful to make sure that the blade will not make contact with the underlying supports or the scrap wood spacers.
Plunge Cuts
Plunge cuts are when you begin the cut in the middle of the work, rather than at the edge. The classic example of when this is needed is when putting a skylight into a roof. Mark the areas that you wish to cut out clearly. Begin near the corner of one side and place the front edge of the saw base firmly on the wood. Lift up the saw guard using the correct procedure (consult your specific manual for details of this). Make sure that you have adjusted the depth of cut to a suitable depth.
Start the motor and slowly lower the back end of the saw towards the wood while keeping the front firmly in place. After the blade has cut through and the base rests flat on the wood's surface, follow the cut line up to the corner. To accurately cut out the corners of the square hole, use a jigsaw (bayonet saw).