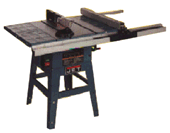
Table Saw

Approximate Cost
$180 upwards (although we believe that for the functionality you really need, the cost is closer to $750).
Description
The table saw is a useful addition to any workshop as it allows you to
rip long planks of wood very easily. While table saw prices begin at a
very affordable level, you should be aware that these cheaper products a
relatively limited in what they can do. Of course, the
larger saws are far more expensive. However, there are alternatives to
the table saw for those who are not yet ready to spend the money (or who
do not have the space) for this tool.
At Amateur Woodworker many of us
still do not own a table saw, even though we acknowledge that using one
would simplify our lives tremendously! Alternatives to the table saw
range from using a circular saw to rip the wood by using a long straight
ruler (or second plank of wood) as a guide to building your own table
saw by making a table that you can clamp a circular saw underneath
(pointing upwards). As an extension of this latter approach, if you own
a Workmate-type bench you may be able to purchase a table saw
attachment.
When looking to purchase a table saw, consider the following:
- Buying a table saw comes down to simple economics. The more money you
spend, the better the table.
- The larger the maximum distance between the saw blade and the rip fence,
the better. Think of what you are likely to be ripping on the table saw:
if it is just small planks of wood, then a cheap saw is okay; if it is
sheets of plywood, then the larger the width of cut, the better.
- Can the maximum ripping distance be increased by purchasing value-added
extender bars?
- Consider how flat and smooth the table top is. A solid, smooth surface
is typically better than a ridged top. At the very least, ensure that
the top is level.
- How large is the saw blade. The larger the blade, the deeper the cut.
- How easy is it to replace the blade? Further, can you add different
thicknesses of saw blade for cutting grooves?
- Is the on/off switch easily accessible in an emergency?
Using the table saw
As with all power tools, the key to using a table saw is to push the wood through gently, not forcing the saw to cut faster than it is capable off (this will lead to the saw binding). A nice steady gentle force is far more effective than trying to rush the cut: you'll get a better cut and the blade will last longer.
When ripping a wide board, use both hands. Apply forward pressure with the hand nearest the blade (but out of line with the blade) while holding the wood firmly against the rip fence by applying sidewards pressure with the second hand.
When ripping narrower planks of wood it is imperative that you use a push stick. Your hands should never get anywhere near the blade. Use one stick to push the wood forwards while a second stick should ensure that the work stays firmly against the rip fence.
Cutting a straight edge on a non-straight plank
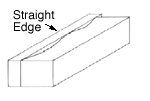
 Cutting the first straight edge on a non straight plank is something that confuses may beginners. However, when you understand the technique, it is not very difficult at all. To ensure that the wood is ripped in a straight line, tack a think piece of straight-edged plywood to the underside of the plank. The straight edge of the plywood sits firmly against the rip fence, allowing you to cut the wood. As a side issue, this technique also cuts the plywood, so make sure you didn't have any great plans for it!
A second technique is to tack a straight-edged plank of wood to the side of the non-straight wood, giving a straight edge that can rest against the rip fence. Both techniques have their good points and bad, so experiment to see which one suits you the best.
 Cutting the first straight edge on a non straight plank is something that confuses may beginners. However, when you understand the technique, it is not very difficult at all. To ensure that the wood is ripped in a straight line, tack a think piece of straight-edged plywood to the underside of the plank. The straight edge of the plywood sits firmly against the rip fence, allowing you to cut the wood. As a side issue, this technique also cuts the plywood, so make sure you didn't have any great plans for it!